Well, my Kaleidoscope Krosswalk Quilt (KKQ) previously referred as the Tinkering Quilt is a Finally Finish and it seemed like it took forever involving some mishaps from start to finish. I started this quilt around the middle of October after deciding rather than participating in a QAL involving HSTs, I would challenge myself with My Quilt Infatuation’s Tinkering pattern which involves making a seven patch block instead of just two patches. Sometimes I feel a little guilty making quick and easy quilts so every once in awhile I will make a project to give myself a challenge and that is just what my KKQ did. I should be good for guilt-free quilting for awhile now.
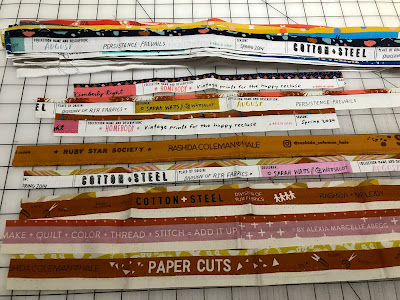
I already pulled approximately 75+ fat quarters and yardage from my stash of original and current Cotton+Steel and Ruby Star Society fabrics which I forgot to take the usual group photo but I do have one of some of the selvages which are so worth saving. They were such a glorious group of fabrics, most of which were accumulated from my participation in Fat Quarter Shop’s fabric clubs. I have been wanting to make a quilt with these fabrics for a long time and looking at the wonderful prints I decided they would be better showcased with the Tinkering pattern I just purchased rather than four-inch HSTs. I should mention that this year I seemed to be having an “infatuation” with My Quilt Infatuation patterns as this is the fourth quilt I made (two Unruly quilts and Flutter).
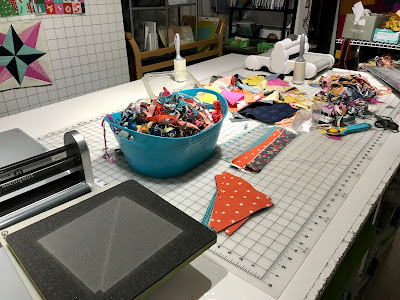
I set up a nice assembly line to die-cut almost 300 patches using both of my Accuquilt die-cutters for the two sizes of HSTs and strip cutting with my Stripology ruler (not shown). BTW, I am not affiliated with any of the products I mentioned in this post.
Once the patches were cut, they were grouped in threes, making sure there was a good variety and contrast with the prints in shades of black, blues, gray, reds, oranges, golds, yellows, pinks, teals, browns, etc. I love this palette even though there is almost an absence of green and definitely no Citronickle which was because I didn’t have the right amount or enough prints to include my favorite color.
Here is an example of one of the groups which there were more than twenty-five and not all of the groups made the same number of blocks since some of the fabrics I had more than a fat quarter.
After I made less than half of the blocks I needed or wanted, I re-injured my left knee which I fractured three years ago, almost to the date. After three days of standing on the concrete floor in my basement studio to press and die cut fabrics and then time sewing and more standing to press and trim blocks, at first four blocks at a time, then twenty blocks at a time, did my left knee swelled to the same size as when it was fractured and I could barely stand nor walk. Unfortunately, Hubby was already in bed at 1am in the morning so I barely managed to climb up the two flight of stairs by myself. Sleeping was pretty miserable that night but by morning I was icing my knee while elevating my leg, taking OTC and wearing a knee brace which I remembered doing from my fracture knee days. And yes, the walking cane was brought out for old times sake. After a week and a couple of Pajamazon Days, my knee felt a whole lot better as long as I wore a knee sleeve and I was able to go back downstairs to the studio to resume working on the remaining 140+ blocks and this time I stood on a padded floor mat and only worked on no more than eight blocks at a time which was what my knee could handle.
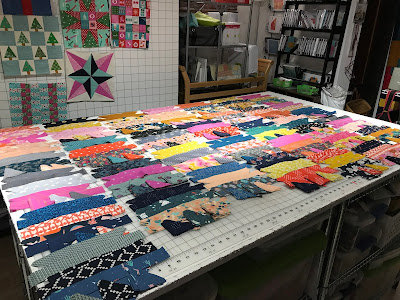
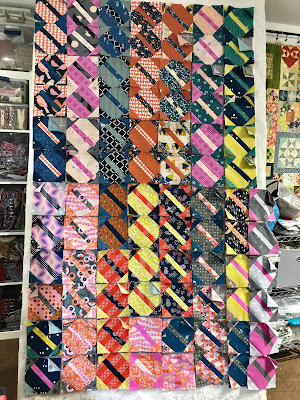
And here are all 232 of the blocks, at first way more than needed since I only had plan to make a 60”x72” lap quilt but decided to make an 84” square quilt since I had enough plus I thought the quilt needed to be square even though this was a size I’m not comfortable quilting but then again it added to the challenge. Another challenge was how the many blocks in this diverse color palette were going to be laid out evenly and preventing globs as much as possible. I decided to separate the blocks into four color groups depending on the center patch: 1) Black and Blues, 2) Reds, Oranges, Gold/Yellow and Brown, 3) Fuchsias, Pinks and Corals, and 4) Grays and Teals.

When the patches were assembled into larger blocks, they were always laid out with the blue group in the upper left corner, the fuchsia group in the upper right corner, the red group in the bottom left and the gray group in the bottom left. Once the blocks were sewn together, the horizontal seam was pressed up. Also, two types of blocks were made, a bolder block (left side) with the deeper colors which had the reds and oranges and quieter blocks (right side) which had no reds or oranges which were alternated in the layout.
This system really helped in the quilt layout and spreading out the brighter colors/prints. The flimsie was finished right before Thanksgiving and the plan was to quilt it right after our return from the GP house and I would have ten days to quilt it before we left again.
But I procrastinated which shouldn’t be a surprise. Besides the machine quilting, I wasn’t really looking forward to the task of basting and ironing the wide backing of a wonderful text print found in the vault. I waited a week or three days before leaving for the GP House during which time I worked on Holiday decorating and playing and reorganizing some fabric stash did I finally decided to start the final leg of this Challenge. Of course, it had to coincide with the day I received my Booster shot and just added to the challenge of doing this with a very sore left arm.

I originally planned to quilt with just straight grid lines, horizontally and vertically along the seam lines and diagonally along the strips. After the horizontal and vertical lines were quilted, I decided to quilt wavey diagonal lines instead for more variety and to add some softness to the lines. But really, it was easier since if I had quilted straight diagonal lines, I would then had to mark all of the lines with either a Hera marker or chalk since I couldn’t use my walking foot as a guide for the 1/2” line needed. BTW, when I first started quilting, my stitches were skipping and I thought the problem would be resolved after I changed needles, rethreaded and installed the new walking foot but stitches were still skipping and I then realized this was caused by the stitch length dial not being clicked in place but was caught between two settings. Once it was clicked in place, the stitching was nice and even.

And wouldn’t you know it, another mishap — after quilting almost the final diagonal line, I discovered a block boo-boo — one of smaller blocks were sewn the wrong way and there was no way I could take the quilt apart to correct it, so what I did was quilt it the way it would have if the block was laid right. It’s a good thing that this block is on the edge and not in the center where it would have been way, way too noticeable. I didn’t do a good of a job checking to make sure all of the blocks were sewn right after I thought I caught the one lone block with a boo-boo since apparently there were two. Thank goodness for the busyness of all the colors and prints.


And the mishaps continued with this Binding Blunder in which I had just enough of the black Netorious print. After telling myself I had to be careful when cutting, I realized after cutting four strips, the print was laying lengthwise and not selvage to selvage. Not wanting to use another fabric because the black Netorious print was perfect and no longer available to buy more and I really want to finally finish it before leaving for the GP house, I decided to finish cutting the strips the right way and alternate the strips by sewing them together with straight lines rather on the diagonal like I usually do. There were around twelve strips to sew together and if they weren’t sewn together with a straight line, I would not have had enough. Thankfully, this isn’t too noticeable and if you’re inclined to follow the binding along a quilt, this will definitely make your eyes crossed.

And finally, to add one more final challenge to the KKQ I decided to sew the binding down by hand which is something I have not done for awhile and only added to the “forever” in the finishing. One nice thing about this is the many TV shows you can watch while hand sewing for almost eight hours and thankful my hands were free from cramps.
After experiencing some days of wind and rain, today was the perfect day to take a photo of the Kaleidoscope Krosswalk Quilt hanging outside of the screen room and I must say it is one lovely finally finish. I was planning on having the Master and Apprentice Quilt Holders hold up the quilt but decided it would be best photographed with less noise coming from the Demando, the Apprentice Quilt Holder.
I thought I include some close-up photos of some of the blocks since I just love the fabric combos and one more of the backing. I came up with the Kaleidoscope Krosswalk name almost when the final stitch was sewn and I may have been influenced by the many colors and shapes created by the fabrics and by watching too many YouTube videos of James Corden Crosswalk Musical with BTS my fav group at the moment. I will mention that the thought of naming it Stinkering came to mind with all of the mishaps I had but thought this quilt deserved a nicer name. Boo-Boo would have been cute though.

I didn’t think my KKQ would take as long as I did but the hours it took allow me to listen to several books and podcasts about subjects I normally wouldn’t have listen to like the making of the movies “All About Eve” and “The Bonfire of the Vanities”. Unfortunately, some of the things I listened to I may associate it knee pain which I don’t think I’ll do when looking at my quilt which I am looking forward to it hanging from the second floor bannister with the wrong block not showing, of course. Would I make another Tinkering Quilt? Oh yeah, plans are underway since I found the leftover patches from my
Spunky Americana quilt which just happens to be the right size and hopefully will be less stressful on my knee. The plan is to just make it a 48” square quilt. I do have one more Finally Finish for 2021 which I will start working on right after this post, it’s my #6 of the Country Threads Dirty Dozen Challenge and thankfully it’s only a wall size quilt. I hope the mishaps have left the studio.

Lastly, I had to include a photo of the Master Quilt Holder who even though he had MOHs surgery on his ear this morning, still was able to hang the quilt outside for me. He would like for me to say that the bandage was due to my chewing off his ear while giving him instructions on how to hang the quilt but we know this couldn’t be true. But, if the bandage was on Demando’s ear, then that would be a different story.

 ,
,