Sunday, January 29, 2023

Serendipity Super Scrappy Strippy Quilt

I didn’t come up with a name for this quilt and one with alliteration until after it was a finally finished and ready for some pics and a boast post. Since starting the Serendipity Super Scrappy Strippy Quilt (S4) back in September and just finishing it yesterday, I realized there was a lot of unplanning and fortunate occurrences with this quilt which started with Demando moving out and leaving his queen size IKEA bed behind and it needing a quilt. 
During this time, I was working on my Tell Tale Blues Quilt and had staggered strip quilts on my mind and knew I had a lot of 2-1/2” scraps leftover from making these type of quilts and other quilts which I could use to make the S4 quilt which would go with the blue bedroom walls. Since these leftovers had teal and aqua in them, I kept them in my bin of aqua/teal fabrics and were reminded of them whenever I happened to be searching in that bin. 
These scraps are mostly from the above four quilts all made in 2018: The Hinto Minto Baby QuiltStacked Squares QuiltEchinacea Dream and Spa Spurts Quilt. I remember the color inspiration for these quilts which were the Delilah blocks Susan Snooks, Patchwork and Play was making at this time. We both loved Anna Marie Horner’s Echinacea Glow fabric in the Pretty Potent color way which included teal and peachy pinks. Not to throw Susan under the bus which I am known for doing to her, is that I was going to link her quilt but could not find it on her blog, since she does not have a photo gallery of all the wonderful quilts she had made and she should. I may be receiving a reply or clarification from her, I think.
Some of the scraps were leftover strip sets and some were 2-1/2” strips and they were sewn together to make a very long strip of two 2-1/2” rows sewn together which were then subcut them into two strip set panel sizes: 20-1/2” and 40-1/2”.
The 40-1/2” strip set panels are in the middle flanked by a 20-1/2” panel on each side. It was an easy make and the flimsy was finished around the middle of September and has been waiting to be quilted since then which at that time I was starting to have problems with Juki Junebug.
Well, Juki Junebug has been replaced with Jinny Janome, my new 1600P, who was waiting to machine quilt one of the many flimsies that have accumulated during the past few years. I was not planning for S4 to be her inaugural quilt and was going to quilt one of the Lotta Jansdotter flimsies from last year but Serendipity/Senior moment struck as I was putting away some fabrics in my aqua/teal bin and was wondering where my leftover strips and strip sets were. I spent some time looking around my studio to see where I could have stored them, were they stuck in a bin with other low volume scraps or were they put aside on the project shelf for a new quilt? I couldn’t find them for at least 15 minutes which was annoying since I rather be sewing than searching. I happened to go by the cart which had flimsies waiting to be quilted and there I saw S4 and realized that I had forgotten that I made this. It’s been four months and like they say, how soon we forget, which is happening a lot with my quilt brain. I knew S4 would be the perfect quilt to test Jinny Janome with since I planned on doing both straight line and wavey lines. Fortunately the Janome open toe walking foot I used on Juki Junebug could be used on Jinny Janome. On a side note, my Juki walking foot which is a closed toe and came with the machine could not be used on Jinny Janome which I needed in order to sew the binding down. I made do with the Janome walking foot and had to use another way to maintain a 1/4” stitch line.
Jinny Janome quilted wonderfully and you can see I played a little quilt chicken on one of the corners of S4 which I did’t noticed after I was almost finished with pin basting. I crossed my fingers and hoped that the machine quilting would not push the top past the batting. I think it helped that before I started machine quilting with Jinny Janome, I moved Juki Junebug upstairs because I know bad quilt karma happens when she’s upset, especially now that she’s second banana. Juki Junebug is at the Spa getting her latest problems fixed and will be moving to the GP house where she sew supreme once again.
Here are some pics showing the wonderful scraps of mostly Cotton+Steel and Art Gallery fabrics along with text prints. I especially love the cat prints. The backing was from the vault and was a wide back print purchased at a nice discount from Amazon several years ago. It’s not as modern as the front but I’m saving my Carrie Bloomston wide back text print for another quilt, not yet made but in my head. I used a CT Essenial Thread in Parchment and the binding was the teal XOXO print by Cotton+ Steel. S4 measures 80”x90” which was pretty large to test Jinny Janome with but I was confident that she could do it. As much as I love my Juki Junebug and already owning a Janome Gem for over ten years, I knew Janome is a pretty good and reliable brand.

One of the reasons why I finished hand sewing the binding while we were at the GP House this weekend was because I knew the Master Quilt Holder (MQH) would need some help holding it up. Also, we left right before a big snow storm and was lucky it didn’t follow us which would have interrupted photo taking. When the flimsy was finished, Demando, also affectionately know as the Apprentice Quilt Holder was still at home and was able to assist MQH. My youngest son and father of the darling granddaughter lives next door at the GP House was able to assist and now will be referred to as the Rookie Quilt Holder. Even though this was his first time assisting, he listened and followed his father’s example and with no lip or complaining as the Apprentice Quilt Holder is known to do. 


The darling Granddaughter was taking a nap during photo taking so I thought I would close this Post with the Serendipity Super Scrappy Strippy Quilt in the foyer and her baby photos in the background. I really enjoy making another quilt using my Staggered Strips and Squares pattern but this time without any squares or rectangles. If you’re not familiar with this pattern, you can check out my “sort-of” tutorial on how I make the staggered strips Here.

January is finally living up to its reputation as we’re experiencing cold at the GP house and we’ll be heading back to more cold as in freezing temperatures along with snow. The only good thing about this is that it is good sewing weather. Now I need a cup of hot tea just thinking about it and wishing warmer days will be coming soon.

Linking up with:My Quilt Infatuation/NTT

Friday, January 20, 2023

Friday Feedsack Quilt Finishes

With just a few hours left to Friday, I am posting my latest finishes of scrappy feedsack quilt projects which I just sewed the last stitches on some of them this morning so I could included Friday in the Post title. I started these in 2021 which seem to me was last year and much to my surprise was something I started two years ago. If you have read any of my previous posts, I do have a special fondness or am I a fanatic for feedsack fabrics. I think I may have made at least ten quilts with feedsack fabrics and can’t bear parting with even the tiniest of scraps, strips or bits so I’m always looking for projects to use them up.
I was happy to finally finish this table topper above which was a project I did whenever we were at the GP House. These were strips leftover from previous quilts and some them are vintage feedsack fabrics given to me by my dear quilt peeps and some are more recent reproductions that I’d purchased.
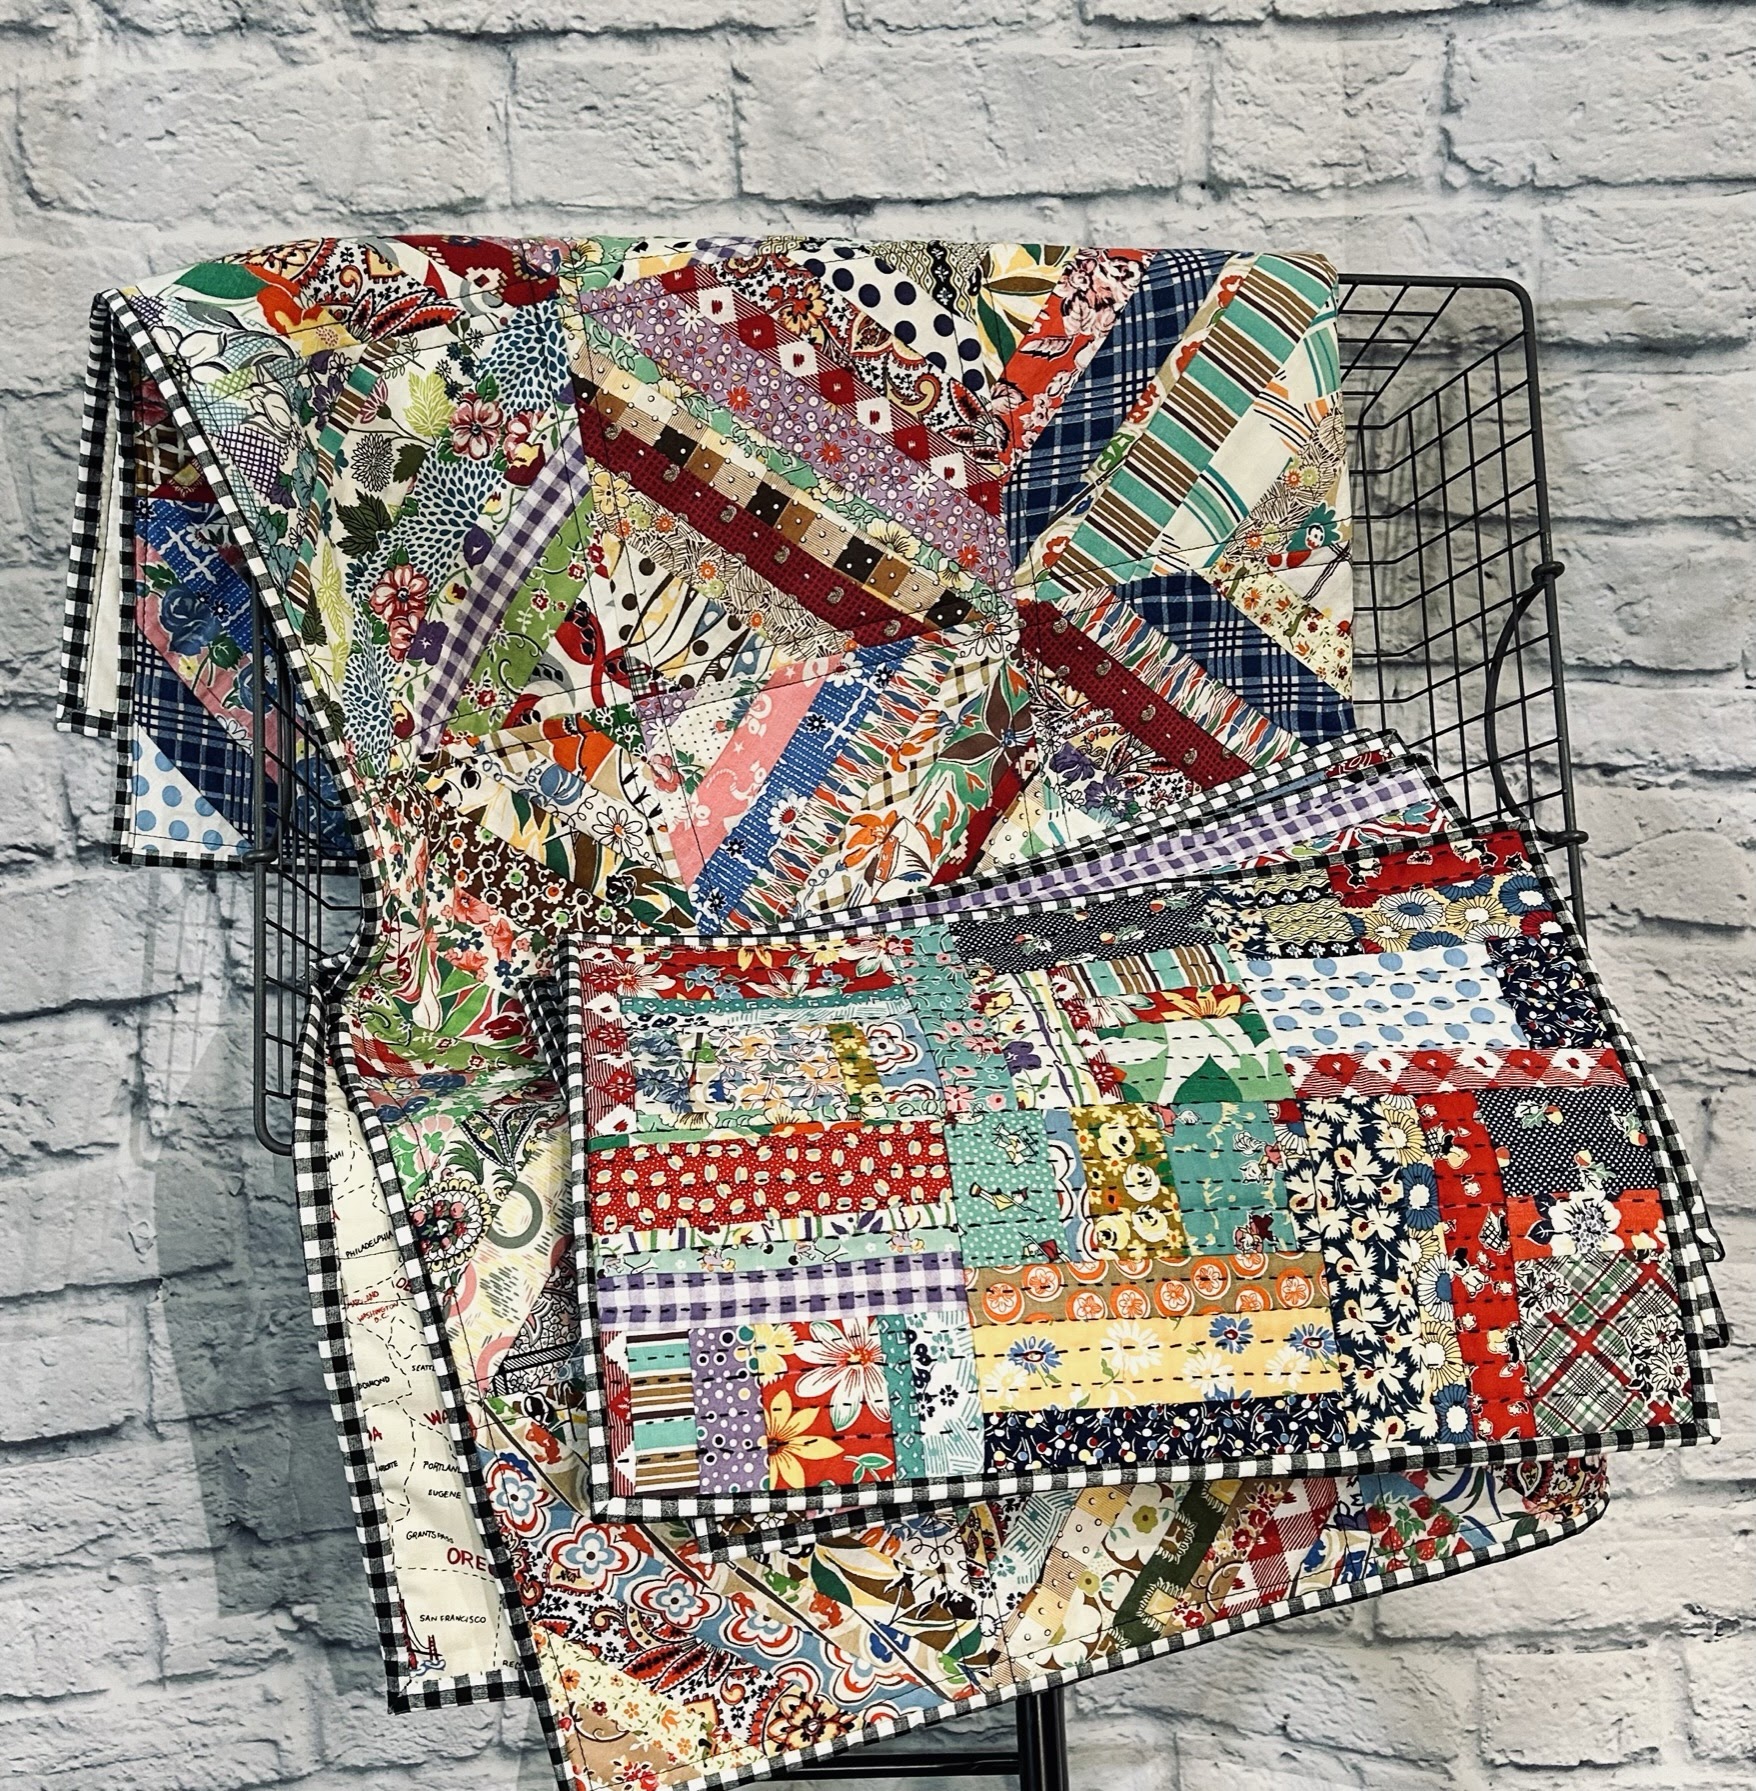
I started sewing strips diagonally onto 8”squares of newsprint from old prospectus back in 2021. Once thirty-six blocks were sewn, I then put them in groups of four for a barn raising layout to make nine blocks. Once the blocks were sewn together, for some reason, I didn’t like the way it looked and took it apart after seen a similar quilt but with sashing in between the blocks and thought I wanted to do the same. But after the blocks were separated, they languished in the studio for a year until I decided what fabric I wanted to use for the sashing. I added these blocks to my 2022/23 Country Threads Dirty Dozen UFO Challenge and this was one of the projects I could have worked on in November. I already had decided on a different project but decided to work on the feedsack quilt because it was an easier finish and I’m trying to catch up. I decided that I didn’t want sashing after all so I had to sew the blocks back together again and I’m pretty sure I didn’t sew it back in the same layout as the first one.
I mentioned in my previous posts that Juki Junebug is not sewing well and I had a bit of a problem when I machine quilted just simple grid lines with black thread the first time. Part of the problem could have been my fault since I used a #40 heavier weight thread in black on the top and #50 on the bottom which I have done previously. For some reason it caused beaucoup puckering especially since I didn’t have the tension set properly. So like having to sew the blocks together twice, I had remove the quilting to do the machine quilting again which the second time was a success since I used the heavier weight thread for both the top and bottom. You can see the quilt lays flatter in the photo above and does not have the peaks and valleys as the first time which I did not take a photo. I was considering hand quilting it but am glad I did not because it would not have been easy on the fingers with the dense weave of some of the fabrics as as well as the seams and the cotton batting.
This quilt measures 46” square and the binding is a black and white check which I love to use with feedsack fabrics. I also love the backing fabric which is perfect for this quilt and I have to share the story as how it was acquired.
Whenever I am at Walmart, I like to check out their fabric department to see if I can score any fabric deals and like I have done before I hit the jackpot with this print. Previously I found a bolt of a black and white splatter print which resulted in me having to climb up in order to get it down from the top shelf. This time, I found a bolt of this U.S. map print laying on the bottom shelf still wrapped in plastic. As I approached it, I checked to make sure this wasn’t a trap by looking up at the ceiling to make sure there wasn’t going to be a cage going to come down on me. I was so excited since I knew this print would be perfect for my feedsack projects and happily found a sales associate to write up this purchase. She insisted on unwrapping the bolt and measuring the fabric because sometimes the quantity is incorrect and it was. Instead of 8 yards there was only 7.5 yards but still enough and it saved me $4. Besides using this for my latest feedsack quilt, I also used it for my feedsack placemats which you will see below.
These place mats were also started two years ago and worked on when traveling to and from and staying at the GP House. Unlike the blocks made for the feedsack quilt, these placemats were made from scraps hand sewn onto to squares or rectangles of batting. This is a wonderful slow stitching project which I came up with for road projects and wrote about it This Post.
Once the placemats were sewn, I then hand quilted with straight lines 1/2” apart with either black perle cotton or black crochet thread which is detailed in the above mentioned Post. 
Once the placemats were quilted and space left for the tacking row,  the backing of the wonderful U.S. map print was added. Like the feedsack quilt, the binding was the black and white check print. I made seven placemats but only finished five for this post because I was thinking I could take a photo of a table setting with the five finished placemats but it has been so dreary for the past few days to take photos in the screen room.
These placemats measures around 12”x18” and if I had thought of it sooner I would have adjusted the size so it could fit more properly in this lovely black wire tray I just purchased this week from Amazon (not an affiliate link). I was thinking that in the future when I made more of these placemats that this would be a lovely Hostess gift which could be filled with food items or dishes. (Or for my blog buddies, I could see one of their cats sleeping in this.) This could happen if I can find another source for these wire baskets since it seems I purchased the last one available from Amazon.
As mentioned earlier in this post, I just can’t throw away even the tiniest scraps of feedsack fabric—aren’t these little balls or as I call them Quilter Marbles (because you have to be sort of crazy to make them) cute? I need to find a cute wire basket to put them in.
I could say that I’m happy to be now finally caught up with my projects for Country Threads Dirty Dozen Challenge but I may be able to squeeze in the quilt I originally wanted to finish by the end of February because my new Janome 1600P is in the house. She has been unboxed and set up in my studio but I have not done a test drive yet. I have named her Jinny Janome and will definitely have something to post about her.  I plan on machine quilting with her this weekend. Meanwhile, Juki Junebug may be feeling a little put out but I plan on having her serviced again with a different repair shop before she is moved to the GP House. I am feeling a little guilty about moving her there but I will be able to work on bigger projects once she is there.

Thursday, January 12, 2023

First Two Finally Finishes for 2023

And just like that, after lamenting in my Last post of 2022 that I was feeling I was falling behind in my participation in Country Threads’ 2022/23 Dirty Dozen UFO because I only had flimsies to show for the months of October through December, I machine quilted and bound October’s and December’s flimsies this  week. This was made possible by Mary Etherington declaring that during January and February there would be no number or color drawn so we can catch up especially since these are the months where snow and cold would make it possible for us to stay home and sew. Well, here where I live in the Midwest, we’re experiencing unusual warm weather in the 40’s and 50’s and there has been no measurable snow for the past two weeks, but I still stayed home to sew after returning from the GP House. Despite really wanting to sew a new project with some new fabrics I received for Christmas and Juki Junebug still not sewing perfectly (I really miss my threads being cut automatically) I am happy that Wonderland, the patchwork throw, and FALLoween I, the future wall hanging are finally finished. Here are the deets:
Wonderland was the last flimsy I finished for 2022 and the plan was for this to be a quick quilt finish since I was only going to back it with my favorite Gray Chenille Plush which I will again mention that this makes for a wonderful, snuggly quilt/throw. Since we’re leaving once again for the GP House this weekend, I wanted to take this to give to the darling Granddaughter in hopes I can reclaim the Carrie Bloomston Patchwork Throw I made last May for me to use in her bedroom. She decided that this must be shared with her and I’m lucky if I get at least a quarter of the throw to snuggle under. Like her Grandma, she likes the feel of the plush backing.
The fabrics for this quilt/throw is from Katarina Roccella’s Wonderland collection along with other Art Gallery prints and some Cotton + Steel prints. These fabrics have been set aside for several years and I decided that this collection would be added to the 2022/23 UFO Challenge list. I just love the combination of the pinks, peaches, plum mixed with the grays and  the minty green I call Aquamint. The focal print of the sweet girls of which I only had a fat quarter would determine the pattern since there was no way I could cut this print into small patches. The prints on the lower right were added since I thought I could use these colors, especially the plum/abergine print.
I’m calling this pattern Easy Ernie Eights, since the eight inch blocks are made up of with either 4”x8”(f) Ernie rail blocks  combined with 4”x8”(f) plain rectangle patches, two plain rectangles or two Ernie rail blocks. I first drew out the pattern on my trusty graph paper to determine how many of each rail blocks/patches I needed to cut and sew. You can see that the sweet girl print was fussy cut into 4-1/2” x 8-1/2” rectangles and I used every bit of the fat quarter; I even had to piece together one of the rectangles together and hopefully the darling granddaughter won’t notice.
Since there was no batting in between the top and the plush chenille backing, I only quilted vertical lines between the four inch segments in a gray polyester thread. The binding is the pink xoxo print from Cotton + Steel, one of my favorite prints to use for binding. The Wonderland Patchwork Throw measures 56” x 80”. If the darling granddaughter still won’t give up the Carrie Bloomston Patchwork Throw, then I will be happy to claim this one as mine, hopefully she won’t decide she needs both of them and Grandma will be left out in the cold.
FALLoween I was a flimsy finished last October and would have been quilted then had Juki Junebug didn’t need to go to the Spa. 
I just love the prints and colors in this quilt as they are a collection of Sandy Gervais prints from when I first started quilting in 1996 and she was with Moda to some of her later prints from Riley Blake. I knew these fabrics would look great with the Cinnamon Spice pattern designed by Ledine Watson of Sugar Stitches Quilt Company and this would be the second time I made this pattern with my Cracker Jack being my first one made last April. I did modify the size of the blocks.
The pieced backing was made with yardage of two Sandy Gervais prints sitting in the stash for way too long and it didn’t take me too long to decide that it was time to use it up for  this very deserving top. I machine quilted with a combination of straight and wavy lines with a CT Essential Thread in Camel. The binding is the orange grid print, one of my favorite prints in my stash and may be the first time I ever used it for binding. Because Juki Junebug sometimes is continuing to sew after I release the foot pedal, I wasn’t comfortable sewing the binding down with her so I had to hand sew which was a good thing to do while watching the three crossover NCIS TV shows. FALLoween I measures 60” square, the perfect size to hang in the family room. I also have a FALLoween II flimsy and considered finishing it also but decided to wait since I still need to quilt my November quilt, which I did before starting this post and does it look awful. Guess what  I’ll be ripping out after this post. I love my FALLoween I quilt and can’t wait to hang it up this Fall. I’ve been wanting a new Fall quilt for the last several years but never seem to be in the mood during the Summer when it was too hot to be working with warm color fabrics. I’ll be ready this Fall for sure.
Here’s some photos taken outside which usually is hard to do in January with the snow and cold. The Master Quilt Holder definitely did not have any problems assisting me. Once my November quilt is finally finished, I am so looking forward to sewing a new project, but then again, I may feel like machine quilting some more flimsies, especially if I order my new machine next week.

Linking up with My Quilt Infatuation/NTT