Showing posts with label Follow Your Own Path QAL. Show all posts

Tuesday, June 15, 2021

Follow Your Own Path/Celebrating a Famous Canadian’s Birthday QAL

June is a busy birthday month in my house being that we celebrate birthdays for myself, my oldest son affectionately known as Demando in Blogland, Granddoggie Daisy and for the past five years a Famous Canadian also affectionately known as Sandra’s Father. While the birthdays celebrated for my family involves cake, I celebrate the Famous Canadian’s birthday by participating in the annual QAL hosted by Sandra, mmm quilts.  Since this is a milestone anniversary of celebrating a Famous Canadian’s Birthday I thought I create a collage of the quilts I made in observance of this fun and important QAL. And talk about having ants in her pants waiting for June 15th, the first day of the Linky Party, so I can post about my Follow Your Own Path quilt which was a Finally Finished  for more than a week.


Here is my quilt for this year’s Follow Your Own Path QAL, a theme that, a QAL rebel like myself, could be inspired to go off course. Surprisingly, I behaved myself by sewing somewhat on schedule and did not deviate much from the pattern which I will mention later in this post.

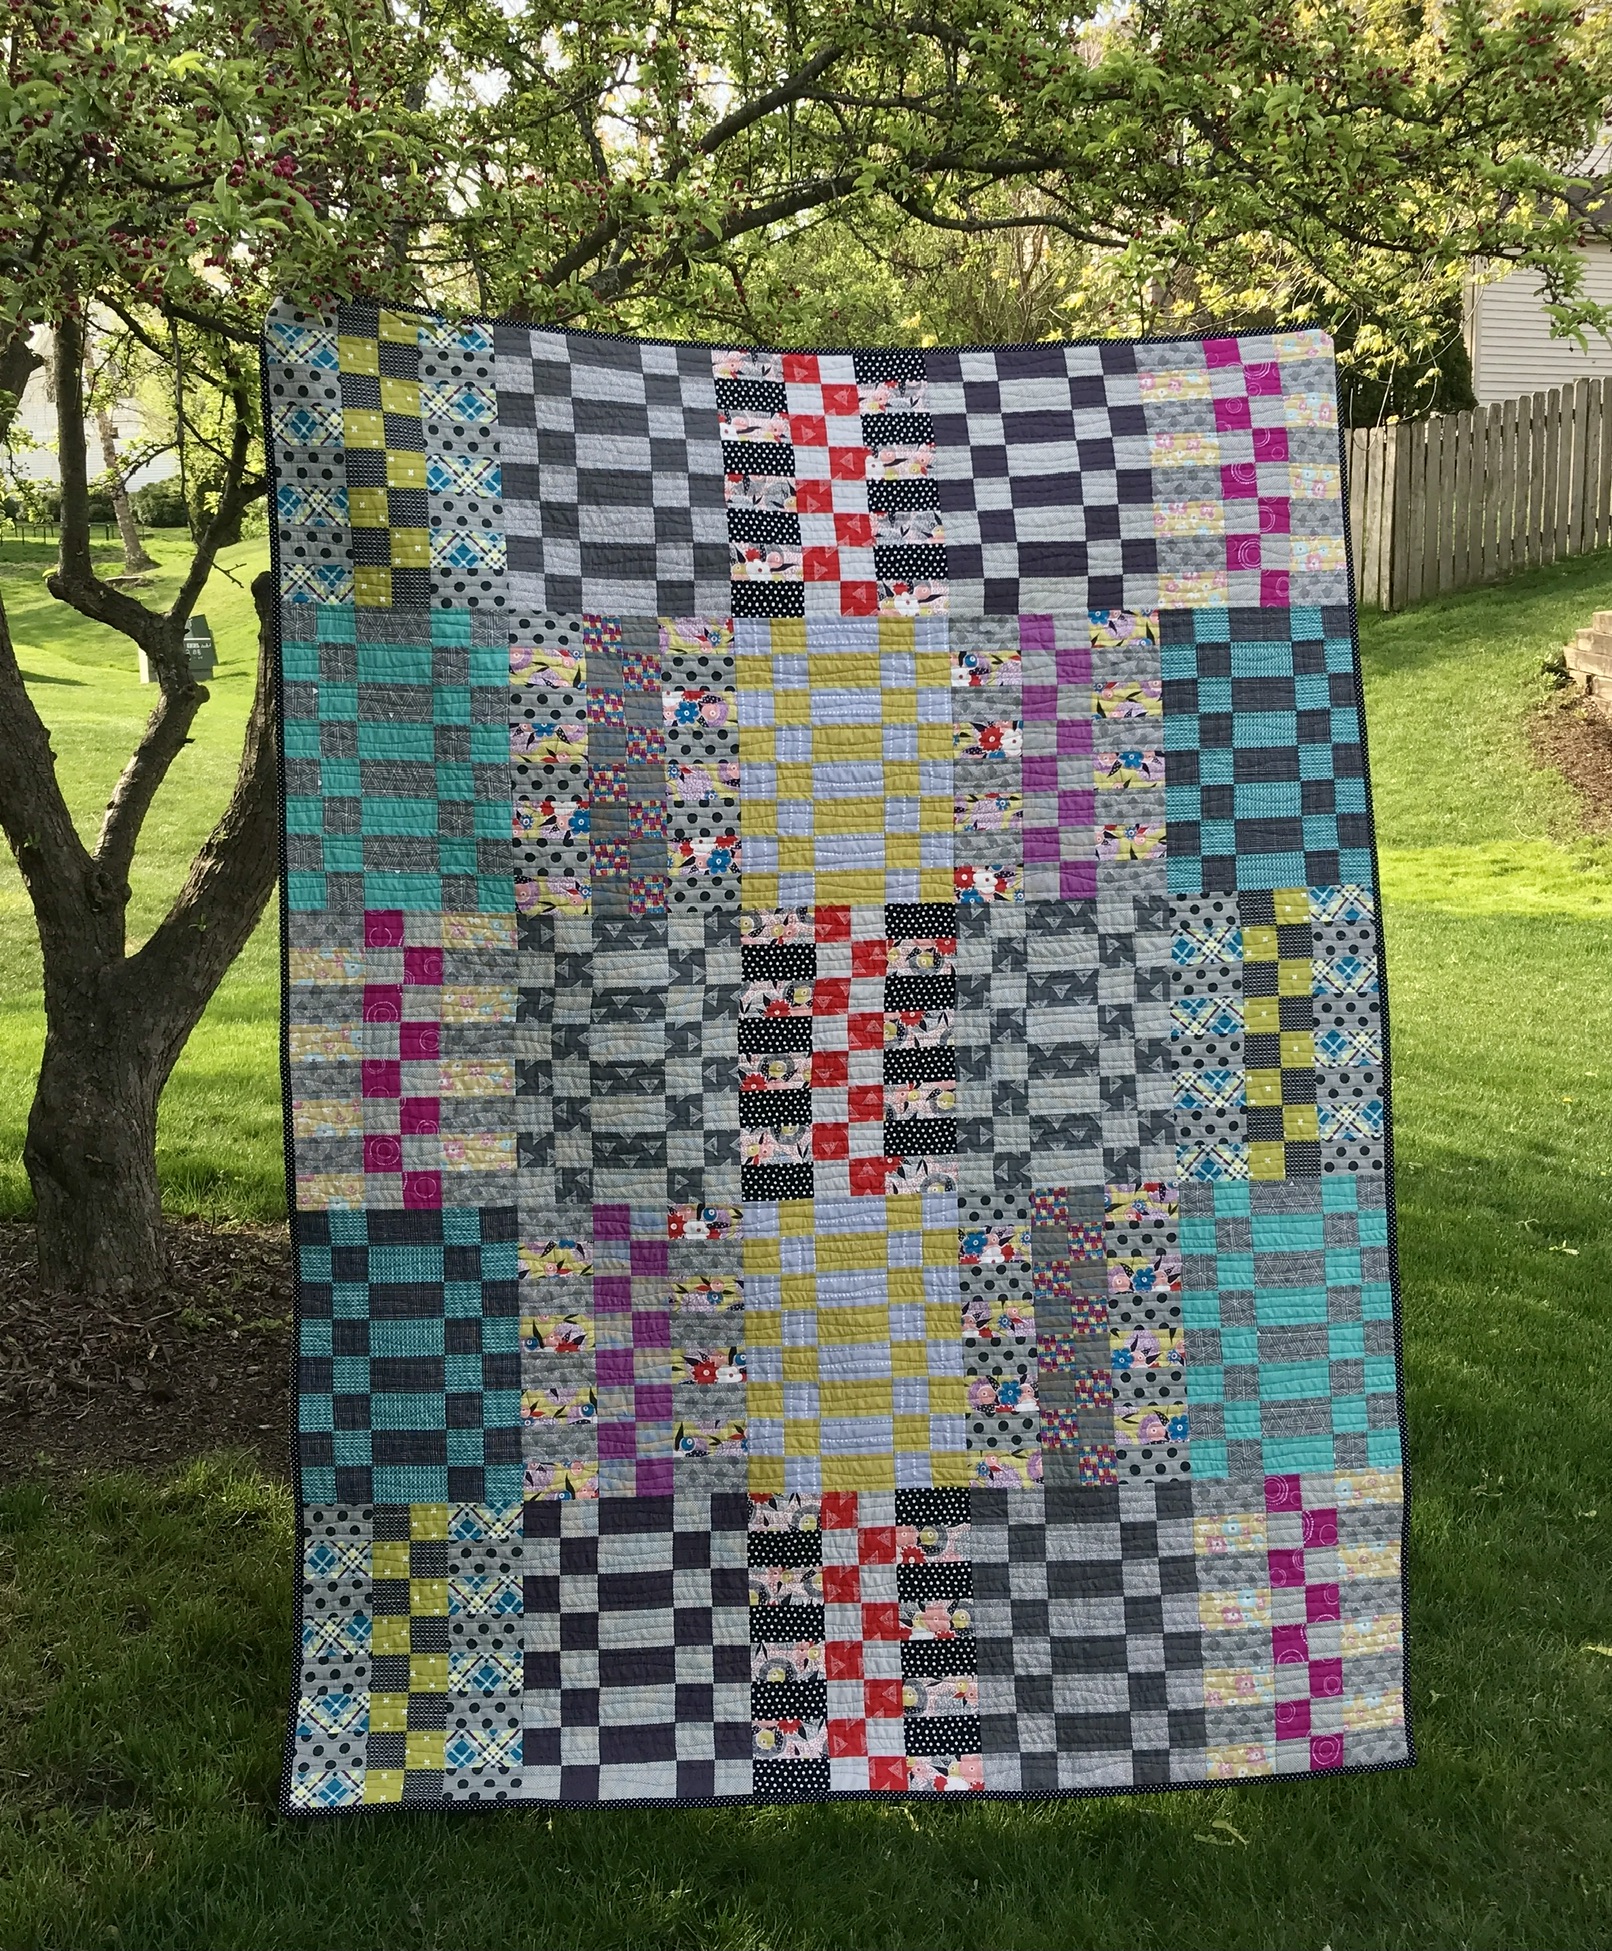
I love participating in Sandra’s QALs; her patterns are fun, quick and easy and I always seem to have just the right fabrics in my stash. I have to confess, though, that this year’s Follow Your Own Path (FYOP) QAL was a challenge to find the right fabrics in my stash. Part of the fun in participating in a QAL is to make the pattern your own and I was having problems because I kept seeing Sandra’s version of the one she made for Modern By The Yard Ezine. I knew that I would have problems finding eight fabrics in four colors with two shades and with the right patterns/scales in my stash.
After several days and hours of pulling out fabrics and coming up with numerous combinations, these are the fabrics I finally decided upon and was resigned to using.  To tell you the truth, I was not in love with this choice, partly because the colors were similar to Sandra’s quilt and I could foresee how this quilt would look. Part of the fun of participating in a QAL is making the quilt your own.
While putting away the piles of fabrics I had pulled in my quest to find the perfect fabric combinations, I passed my bins containing new fabric purchases.  Out of the corner of my eye, I saw this fabric neatly folded, tucked under some other fabrics, but enough for me to see that this was the fabric I wanted for my background. I thought I could exert QAL Rebel privilege by using the same black fabric which was going to be my background for the shadow arrows. Combined with using Basic Grey Grunge fabric of which I have a nice colorful collection in my stash, this would work and this combination definitely made my heart sing. Unfortunately I only had a 3/4 yard remnant of this background and I needed more. I purchased this remnant online and the selvedge didn’t show the maker or the name of the fabric line. Thanks to some sleuthing of past online purchases, I was able to determine that it was from Dear Stella and after typing a search for Dear Stella Graffiti fabric I had a name for this fabric line: Pour Some Sugar On Me which I think was inspired by a 1987 song by Def Leppard which may explain why this fabric line had a rock music theme. I was able to purchase yardage of this fabric, on sale, from Hancocks of Paducah.
So, Grunge and Graffiti makes my FYOP quilt and is fitting of my usual QAL Rebel-ness and the theme. On a side note, as for using the same black fabric for the shadows, not being a rebel, because Sandra in her   
April 4th post confirmed that you can use black fabric for all of the shadows which was a “YES or fist pumping moment for me. The only thing that concerned me was that I had to wait several weeks for the fabric delivery which postponed my “follow the schedule” mantra for this QAL. I should mention that I had intended to make the smaller version of FYOP but chose to make the throw size so I could showcase more of the cool fabrics.
Once the fabric was received, cutting the fabric was smooth sailing, thanks to some of the patches were die cut and being able to cut the larger patch sizes with my Stripology ruler. (I should mention there are no affiliate links in this post.)
Like all of Sandra’s previous QAL patterns, these arrow blocks were a snap to make despite having to pay close attention to the arrow orientation. Really these arrows could have been made at one time but someone was following her mantra. Leave it to Sandra, the Shadow Master, so named by Kathleen McMusing, to figure out a shadow can be created with just three patches of fabric. I see from posts on Instagram and on Blogland, there were a lot of participants who finished their quilts early, probably, I think, because the pattern was just that fun and quick to sew.
Once the flimsie was sewn, I decided to add a 2/-1/2” border with the background fabric so some of the shadow arrows would not be next to the binding which was going to be the same fabric as the shadow arrow. This is my only deviation from the pattern.
This black and white paint splatter print by Springs Creative was perfect for the backing and a nice alternative for wanting to preserve the remaining yardage of the background fabric. I found this fabric at Walmart and purchased a whole bolt of it since this print would work so well with some of the modern quilts waiting to be quilted. I found this bolt on the very top shelf which involved some climbing on my part since hubby was shopping elsewhere in the store. If you’ve seen the YouTube video of a huge Monitor Lizard inside a store climbing up a shelf, that’s what I looked like, but not as graceful.
One of the reason why the background fabric is important for me when I do a mmmquilt pattern is that I need it to hide or camouflage my lackluster quilting.  I had wanted to do quadrant quilting but I couldn’t line up the arrow points with the quilting lines so I did horizontal straight line quilting, 3/4” apart.  Inspired by the Follow Your Own Path theme, my quilting lines were not always straight, sometimes I couldn’t see the guide lines, especially on the background fabric and were in some places, downright wonky. I used an Essential Thread in gray for the machine quilting. FYOP measures 58”x64”.
Kathleen McMusing already posted her FYOP quilt last month and threw the gauntlet down as to finding a cool place to photograph your quilt. Knowing of some of the other participants in this QAL, like Diann who lives near a sculpture park and Wendysota (Wendy from Minnesota) who wouldn’t surprise me if she captured a Bear to hold up her quilt, I created a collage of where my FYOP quilt would look great thanks to some photo dropping via PicMonkey.
This one is my favorite taken when we were visiting South Carolina several years ago.
After hanging around all of these photos, my FYOP quilt deserves a rest on the porch steps at the Grandparent house. I’m not sure of this quilt’s final resting stop but I did offer it to Demando to hang in his bedroom since it would go well with the other graphic art he has hanging around but he declined. Surprisingly, he does not like the background. Demando did mentioned, though, that he would like a new quilt for his bed, the nerve.
Again, for the fifth year in a row, I would like to thank Sandra for designing this wonderful pattern and hosting, as usual, a fun QAL, “ton père strait fier”. Be sure to check out the Linky Party to see the other FYOP quilts and don’t be surprised if you see a Bear holding up Wendy’s quilt. As for suggesting future QALs like I’ve done in previous posts, I thought I mention that I would not have a problem with using my graffiti background fabric again. Also, still hoping for Bella to be one of the prizes.

Linking up with MMMquilts Celebrating a Famous Canadian’s Birthday Linky Party

Sunday, May 23, 2021

A Pair and a Spare of UFO Finishes for May

I surprised myself by finally finishing three UFO flimsies in the course of one week which included a three-day visit to the Grandparent House. I only planned on finishing just the one I committed for Country Threads’ Dirty Dozen UFO QAL which in turn prompted me to finally finishing the other two.
The first flimsie finally finished was my May Quilt which was my #8 for the Country Threads’ Dirty Dozen UFO Challenge. The flimsy was finished in 2013 and was made from fat quarters and yardage of Lori Holt’s Gracie Girl collection. Aren’t these prints fun?
This quilt measures 39” square.  I’ve become fond of quadrant quilting ever since I did this on my Frosty Flakes Quilt and glad I thought of this when I was ready to quilt Gracie Girl. The only marking I had to do was drawing a “X” with a Hera marker across the top and then quilting it. From there, I quilted 3/4” apart on each quadrant with a Silver Aurifil thread. The backing was a gray polka dot from the backing vault and thankfully the binding, a grey and white mini check used in the top was found in the binding drawer. 

The machine quilting made my Gracie Girl quilt somewhat stiff and would be perfect for a play mat or a wall hanging. A funny thought came across my mind as I was finishing this quilt which was several years ago when I finished a baby quilt for a QAL, I found out my niece was expecting a baby as well as her oldest daughter was graduating high school. I brought the QAL baby quilt to the daughter’s graduation party. Now her son is graduating from high school and the party is next week so I’ll be checking with her to see if I need to bring Gracie Girl to the party. I’m pretty sure I won’t have to, but it’s going to be fun just to ask her.
After the Gracie Quilt was finished before we left for the Grandparent House and upon my return I thought it would be nice to finally finish the Glamping Flimsie which was made the same time.  I thought the fabric was another Lori Holt collection but actually was designed by Mary Jane Butters for Moda and came  out the same time. I only had a charm pack of this collection and yardage of the teal and white check.  I added some white with teal/green pin dots to make this simple baby quilt of squares and rectangles or modified coin quilt which measures 39” x 42”.
The quilting was a combination of straight lines 3/4” apart on the sashing and wavey lines on the squares and rectangles and Essential white thread was used.  The pink patchwork print was found in the backing vault and really fits the “girliness” of this quilt. I almost couldn’t find the binding which I swore I put it in the binding drawer over seven years ago. After clearing out the drawer I found it stuck in the corner; proof that Hubby is right that it’s always going to be in the last place you look and I say I really need to reorganize the binding drawer. My plan for this quilt when the top was made to gift it to good Quilt Peep Mary who goes camping and was also celebrating the birth of her first grandchild/granddaughter. Now Mary has four granddaughters and I’m having second thoughts of keeping this for myself since I’ve been dreaming lately of Class B Campers. Do I need another quilt- No, but I always want another quilt. The Glamping Quilt is definitely one for traveling and I’m looking forward to taking it on vacation when we travel to Colorado in August. I’m pretty sure we won’t be traveling in a Class B camper.
When I was pulling out the Gracie Girl and Glamping flimsies, I came across the Fireburst Mystery Flimsie which was finished in 2018.  This was a mystery quilt hosted by Tish’s Adventures in Wonderland and I know that it remained a flimsie because I did not know how I wanted to quilt it. After Gracie Girl was quilted, I knew I could do quadrant quilting for the Fireburst quilt. I used the Silver Aurifil which blended really nice with all of the colors. This quilt measures 32” square and the plan is to either to give it to my son who lives next door to the Grandparent House and has purple living room walls or my new neighbor on the other side of the Grandparent House who loves purple. For now, I think I’m going to keep it awhile since I love how it turned out. Also, I have to make sure I link up to Tish’s UFO Busting post.
Here’s a photo of the pair and spare hanging on the garage door which is a nice substitute for a clothesline as long as you have strong magnets.
I should mention that before I started on the final two flimsies, I had to get caught up with the Follow Your Own Path QAL hosted by Sandra, mmmquilts by sewing the blocks together. It’s ready for quilting and I’m pretty sure it going to be straight horizontal line quilting but do I dare do quadrant quilting? Either way, this quilt will be done in time to celebrate a famous Canadian’s birthday on June 15th. I know it’s going to be a wall hanging either in Demando’s bedroom, although he doesn’t know it or in the soon-to-be basement studio at the Grandparents House which is another post for another day. I’m not entirely sold on the idea, something to do with the long meat hooks found hanging in the basement. Good Quilt Peep Mary thinks since the  house is almost a hundred years old that meat, etc. was hung there because it was cold down there. Confession: it’s been two years and I have not yet set foot in the basement, Hubby shows me photos.
Finally, I am enjoying sewing my Glitter blocks and sew far have ten blocks done. It’s a nice project to do when traveling to and from the Grandparent House but as I tell Hubby, it would be easier if I was sewing in a Class B Camper.
As I tell Hubby, I saved 100K with the purchase of this Everything Mary Large Lap Desk for $6 which makes sewing the EPPs much easier but not as nice as it would be in a Class B Camper. BTW, Demando the Paramedic/Firefighter saids that I should not be using this tray in the front seat in case of an accident so there will be no sewing when road conditions are iffy.

Thanks for reading this rather long post and we’ll be leaving the Grandparent House before the Memorial Day Weekend. I’m hoping to have one more Finally Finished before the rather lovely month of May is over.

Sew Safe!

Thursday, April 29, 2021

The Ernie Express Quilt, Etc.

It isn’t very often when after a quilt is a finally finished that the weather is co-operative for taking photos outside. This past Tuesday was one of these rare occasions with beautiful sunny skies, warm temperatures with a slight breeze and the landscaping around our house looking presentable thanks to the Master Quilt Holder which made taking photos such a pleasure for once. 
Last August, I purchased a fat quarter bundle of Jen Kingwell Grainline Wovens with the intention of making another Ernie Quilt (You can see the previous ones make here) with this and  my stash of Jen Kingwell fabric scraps. After my strips were cut, combinations decided and strip sets sewn, the project was put away and sort of forgotten until I happened to come across it this past March.  
As I was ready to start cutting the strip sets to sew the 4”x8” blocks, I happened to catch with the corner of my eyes, the 6” Checkerboard Express block which I designed for Moda’s 2017 Countdown to Christmas, (You can see the tutorial here), hanging on the board next to my sewing machine. I thought that I could spice up the Ernie Block if I changed the orientation of the block and make the blocks 12” x 16”.
I also had another idea of instead of using just two fabrics, I would use four fabrics just like the original block I submitted to Moda. I decided that this block would be my “A” Blocks which would be the checkerboard blocks in the center and the rail blocks on the outside. Since I didn’t want all of the blocks to be “A” which then all of the checkerboard segments of the blocks would be lined up and running up and down the quilt, so to offset this, I designed a “B” block with the checkerboards on the outside and the rail block in the center and only using two fabrics. Because of this newly inspired design, I had to add some Cotton+Steel and other bright prints so there was enough fabric and variety for more strip sets.
After the Flimsie was finished earlier this month, I have to admit I was disappointed with the way it turned out. I liked how the “B” blocks with using just two fabrics looked and wished the “A” blocks only had two fabrics also. It’s rather ironic that after the Checkerboard Express Block with the four fabrics was accepted by Moda, I switched to just using two fabrics to keep it simple and because I liked it better--wished I remembered this when I started making this quilt.
But I’m happy to say that once I quilted it with a combination of straight and wavy lines, I really love this quilt now.  The colors and fabrics are so happy. I used an Essential Thread in Charcoal Gray and the binding was a small white polka dot on black print. Also what is nice about the Ernie Express Quilt is that it’s a finally finished but I am feeling a little guilty that I have 12+ flimsies waiting to be quilted and this one jumped ahead of the queue. Maybe it’s because I just purchased yardage of the black and white splatter print last week and knew it would be a perfect backing for the Ernie Express Quilt.
Here are some close-up shots of some of the blocks so you can see the quilting and the happy fabrics.
Before I quilted the Ernie Express Quilt, I was planning on making another one with using just two fabrics for the Type A and B Blocks with my newly acquired stash of Alison Glass fabrics but now am having second thoughts. I’m thinking now of just making just the usual Ernie Quilt unless I see another pattern for these wonderful prints. But if I do make another Ernie Express Quilt, I will provide instructions on how to make it since I’ve come up with a different and maybe a faster way to make the blocks. If the strip sets for this quilt weren’t already cut and sewn, I would have made it this way.
I thought it would be interesting to show a photo of my first Ernie quilt made over four years ago with Jen Kingwell fabrics next to the Ernie Express Quilt, so named since it was inspired by the Checkerboard Express block.
Here’s a photo of the happy Master Quilt Holder who was glad these photos went without a hitch. This quilt measures 60” x 80” which was just the right size to hang it on the garage door with heavy duty magnetic clips which I learned about these from Shannon, The Fleming Nines, who learned about them from Myra, Busy Hand Quilts. Between hanging long quilts from the garage door or from the gutter outside the screen room, I don’t think a clothesline is needed which makes the Master Quilt Holder very happpy.
I had to include a photo of the Ernie Express Quilt with my metal goat Susannah as a shoutout to Mary Etherington, Country Threads, the designer and inspiration for the Ernie Quilts.
Just when I’m thinking that my stash of Jen Kingwell fabrics is dwindling, I’ve decided that I need a new challenge, which didn’t involve falling down and bumping my head and making me forget I have a “fear of Jen Kingwell patterns.” Maybe it’s because of inspiration from my down under quiltTormentor Sue, Patchwork and Play and her wonderful creations she’s been posting lately on her Instagram and Blog.  I have a new “forever” project with Jen Kingwell’s Glitter pattern which I’ve been procrastinating doing since finishing Smitten several years ago. The templates were purchased back then and I admit I was not looking forward to cutting the fabric until I saw that paper pieces were available.  I originally was going to use reproduction fabrics but decided that I needed more Jen Kingwell fabrics so I purchased a fat quarter bundle of WikiPops and a jelly roll of Fine and Sunny, my early Mother’s Day present. Cutting the fabric pieces will be easy with the templates and using 2-1/2” strips, which I am looking forward to cutting up my new stash. I think there might be leftovers and another Ernie quilt would need to be made which now seems to be a tradition.
My first four blocks for the Sandra, mmmquilts, Follow Your Own Path QAL, are sewn and I am happy to say these blocks were a snap to make which is no surprise. After participating in all five of Sandra’s QAL, her patterns are fun, sew easy and quite conducive to wanting to finish the quilts all at once.  I am quite surprised at myself for sewing on schedule and not being the usual “rebel”in her QAL. But I do have a new name for her; the great mmm-tivator. Funny I had visions of Darth Vader and hearing the Empire music as I was typing this.
Thanks to my Accuquilt Go Baby die cutter and Flying Geese die along with my Stripology Ruler and a brand new blade on my rotary cutter, the remaining patches are cut and I am ready to sew the rest of the blocks.  My quilt will be the throw size and my arrows will be going both left and right. But before that, the dreaded Tax Returns must be filed first.

If you have been reading other posts on Blogger, you will know that starting in July, Feedburner will no longer be sending posts through email but you could continue seeing posts through Bloglovin which is a problem for me since my posts are no longer being picked up by them. I’ve contacted them several times and have not yet received a response. For several years I’ve been avoiding link-ups since it seem to be atttracting “strange” activities on my blog but I guess I will start doing link-ups again. Hopefully I can resolve my Bloglovin issues before July.

Linking up with My Quilt Infatuation, Needle and Thread Thursday and From Bolt to Beauty, Brag About Your Beauties.

Sunday, April 18, 2021

Slow Stitching, Scraps and Small Quilts

I had mentioned in my previous posts of being inspired by the many posts from other quilters who shared their Kawandi, Kantha,  Boro, Sashiko, etc. quilts and since then have learned of Chiku Chiku stitching. You can find wonderful examples of these techniques on Pinterest. All of this to me translates to big stitching which I’ve been happily doing for the past months in between visits to the Grandparent house and during downtime (watching TV) when I am home. I thought I would share the projects I have been working on or have completed.

Although I liked the techniques behind the Kawandi, Kantha and Sashiko patchwork quilts, I thought I would work on the patchwork blocks, which were scraps I hand sewn to batting squares while traveling to Yellowstone in September of 2017 which you can read about it in this Post.
My original plan for these blocks were to either make coasters or pincushions and since there were around nineteen squares sewn, I thought I didn’t have a need to make that many of them.

After I trimmed them, there were at least twelve of them which were 6” square and thought I could make two rectangular quilts or placemats.
Before the backing was added, I did big stitch hand quilting with #10 white crochet thread.  I got this idea from BanjoFlannel Method of Patchwork Sashiko.  The rows were spaced 1/2” apart and after I quilted four rows, I skipped a row. After I was done big stitching, I then added the backing and machine quilted the binding. You can see in the photo above, the 1” spacing between the four rows.
The reason for skipping a row was that once the backing was added, I then quilted this row, which there were three, and I consider them to be the “tacking” row” since their purpose to hold the backing. This is something I learned from making several quilts with the  Quilt As You Go method, and that is, since the top and batting are quilted together and once the backing is added you only need to quilt it at certain intervals to keep the layers together.  I liked how these turned out and after all of the big stitching I did I don’t want to use them for placemat since I can’t bear to see them getting stained.
I’m really liking the big stitch hand quilting and used it for this small wall hanging which had been a flimsie for over ten years.  I did do some machine quilting in the ditch before hand quilting the three layers.  I will say big stitch quilting is much easier when only the top and batting is involved. This small quilt is what call my Patchbox Quilts which I someday need to write a Post about my idea behind these small quilts.
It’s funny that I went into 2021 subconsciously wanting to start making small quilts which is what I’ve been doing when I’m at the Grandparent House which is much easier to make than a large quilt. The quilts on the bottom of each row are ones made from patchwork blocks with batting and ready for big stitching and the others are machine piece and waiting to be machine quilted with some big stitching accents
Here’s another one I’ve been working on where I machine pieced scraps onto a piece of batting and did various stitches with #8 Perle Cotton which I love.  I left some areas unquilted and once I add the backing, I’ll add the “tacking” stitches. What I like about these projects is that I have several of them going on at once and I can switch between them when I get tired of working on one of them.

I now have assembled a project box containing patchwork blocks, batting squares and scraps which is ready to take when traveling between the two homes. The tools and notions are kept in a separate pouch. This is really a nice, portable project and a great way to use up the scraps that just keep on multiplying.
And here’s another small quilt just finally finished which is my #2 of Country Threads Dirty Dozen UFO Challenge.  The top was finished in 2017, coincidentally the same time when the beforementioned Patchwork Blocks were first sewn.  This quilt measures 25” x 33” and is a combination of wool circles and squares made from Thimbleberries fabric.  This idea for this quilt was inspired by one I saw on Pinterest from orangesink blogspot and this is the second one I made based on this pattern.  When the Dirty Dozen UFO Challenge started last year in July, this is the one I really wanted to finish sooner than later since I  have a spot for it at the Grandparent House.
We’re leaving for the Grandparent House tomorrow for a four-day visit and upon my return, I’ll be setting aside my Slow Stitching projects for some serious sewing— Sandra of mmm quilts’ Follow Your Own Path QAL which according to me is the sixth QAL of hers which I have participated. More importantly, this is the fifth year I will be celebrating a Famous Canadian’s birthday and I’m thinking a special commemorative T-shirt needs to be designed. My fabrics have been chosen and surprisingly I have not yet started nor plan on doing any deviations.

Today would be a great day for stitching but sadly doing the Taxes are yelling at me.