Showing posts with label Carrie Bloomston. Show all posts

Thursday, July 7, 2022

A Happy Stripes Quilt

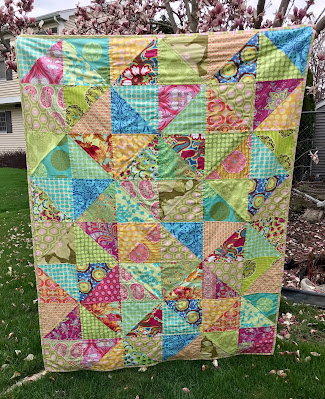
When I first saw Emily Dennis’ Happy Stripes  pattern, I knew I had to purchase it because it was a great stash buster pattern for 2.5” strips. If you seen my other quilts, you know that I love this combination. The fabric in my Happy Stripes quilt might look familiar since I just finished in April my Carrie Bloomston Unruly Patchwork Throw.
A little bit of happenstance with the making of the Happy Stripes quilt which made me wonder if I really have a Fairy Quilt Godmother in my studio. After I ordered the pattern and I was thinking of using my Carrie Bloomston stash since it was fresh on my mind after making the patchwork throw. I really do love my stash which includes several of her fabric lines which work so well together. I just so happened to see a purple tote bag sitting on the bottom of my project cart and decided to look to see what was inside. It contained approximately 150 2.5” strips cut from my Carrie Bloomston stash maybe last year and had forgotten about it. I just needed to die-cut 25 more strips and HSTs from the Newsprint fabric and I was ready to make this quilt.
Over 60 different prints were used. After grouping the strips in sets of four, there were sixteen different combinations,  After sewing the strip sets which made four rail blocks, the connecting corners were sewn on different sides of the rail blocks so it would look like there were more combinations.
The Flimsy was finished by the end of May and I had to wait until after my busy June was over before I could finally machine quilt the Happy Stripes quilt.
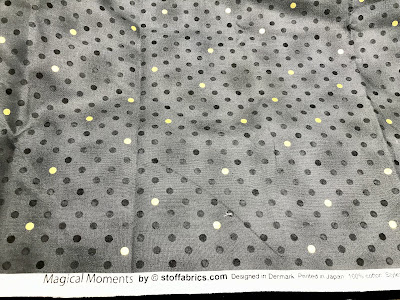
No surprise with the machine quilting with my go-to combination of straight and wavy lines with CT Essential Thread in #20858 Stone. The binding was a Stoffabric gray/black dot print with gold metallic and not from the Carrie Bloomston stash since there wasn’t enough yardage of a solid print which would work and  I thought a scrappy binding would look too busy. Lucky me for just purchasing a yard of this print when I was in Colorado last month.
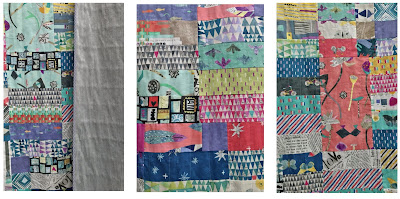
The Master Quilt Holder had a little trouble holding up this 64”x88” quilt to show some of the backing which is the Pueblo Stripe print from the Carrie Bloomston stash. I purchased beaucoup yardage of this several years ago from Bernie Kringle’s Needle and Foot Shop and I knew one day I would make a quilt to finally  use it.
Here’s another photo of the Happy Stripes quilt. A sad note about the finishing of it; after spending Saturday and Sunday with friends with holiday get togethers,  my plan was to spend the Fourth of July machine quilting. Instead, I spent the morning and early afternoon glued to the television because of the awful shooting at a parade which happened in a town just 27 miles away. This is a beautiful town I am familiar with, visited and even dreamed of living there. I finally made it to my studio late afternoon and quilted with a heavy heart once again. It is days like these which I find comfort in quilting and it’s happening much too often.

Linking up with: My Quilt Infatuation/NTT

Wednesday, May 4, 2022

A Pair of Patchwork Throws

Whenever I back a quilt top with just a plush fabric like Minky, I call them a Patchwork Throw since there is no batting in the middle. I’ve made at least twenty Patchwork Throws during the last six years and like to make them for a number of reasons; they finish quick with simple quilting, feel and wash nicely, no need to iron the plush fabric and a nice way to finish a flimsy which may have been sitting around for too long. The pair above are for me, the one on the right is for my bedroom at home and the one on the left is for me to use when sleeping in the darling Granddaughter’s bedroom. Here are some deets on these pair of Patchwork Throws.
The Amy Butler Patchwork Throw is my April finish for the Country Threads Dirty Dozen UFO Challenge. This is the second patchwork throw finished for the Challenge, the first one Innocent Crush was posted last August and I mentioned that I would be finishing the Amy Butler throw some day. Both of these throws were made with 8” HST from over five years ago when I went on a die-cutting spree after I purchased the die. This throw measures 48” x 64”, a nice lap size for keeping the legs warm when sitting and is backed with one of my favorite plush fabrics in lime green. I machine quilted with straight and diagonal lines and was pleased with how it looks and feels. BTW, this is the second patchwork throw made with the Amy Butler fabric since I made almost 100 HSTs back then. The first throw was a quick gift I made for my Godmother who was recovering from a knee injury in 2016 and also the first time I ever made a patchwork throw. I can’t say enough how nice these are.
After I finished the Amy Butler Patchwork Throw, I thought I would work on my Carrie Bloomston quilt which is a modified Unruly Pattern by Kelly Young, My Quilt Infatuation (not an affiliate link). I started  sewing the strip sets almost a year ago and finally pieced the blocks. After the flimsy was finished, I decided to make it a patchwork throw since I needed one and I like them for sleeping. I bring one whenever we travel and stay at a hotel. I have to mention that the second patchwork throw I ever made was with Carrie Bloomston fabrics but a little smaller.
The backing is a gray chenille plush which is another favorite. I machine quilted with straight vertical lines spaced 2” apart. Again, this throw quilted beautifully. The gray binding was the only print which is not a Carrie Bloomston fabric and is a print from Ann Kelle’s Remix fabrics. This throw measures 54” x 90”. 
The Master Quilt Holder was able to help me this time as his knee is feeling a lot better.  He was able to climb the step ladder to hang one throw and stoop a little for the other throw—glad to have him back. I wish the weather would have been nicer for the photos outside but we’ve been experiencing cloudy and rainy weather for the past week. Supposedly, we may have some 80 degree days next week but I’m pretty sure I won’t have a quilt ready to photograph outside. Would you believe the next project I’m working on involves more Carrie Bloomston fabrics. I forgot to mention earlier that I really love her fabrics.

I’m looking forward to a nice and relaxing Mother’s Day weekend and hope you are too.

Linking up with: My Quilt Infatuation/NTT

Tuesday, September 8, 2020

Septe”MMM”ber Shine

It’s been awhile we’ve been home for at least a one week stretch and one of the projects I needed to finally finish was my Shine Quilt designed by Sandra (mmm quilts).  The flimsy was finished in early August but in between the numerous visits we made to the Grandparent’s House since then, this was the first time I had a decent block of time to tackle the quilting.  To tell you the truth, if you’ve seen Sandra’s Shine Quilt and admired the exquisite quilting she did on her quilt, you would understand my hesitancy in quilting straight lines which is the only type of machine quilting I do besides wavy lines and thinking that it would look too bland.  Surprisingly, I love how the straight lines looks and doesn’t the sunlight dappling through the tree branches onto the quilt make it “Shine”?
To give you a little back story on how the quilt got to be made, Sandra asked me a few months back if I would like to be a pattern tester for her Shine pattern which you may wonder why she would ask me since I”m a little rebel or tend to “misbehave” when I joined her QALs which have been, according to my calculations, five.  I’ve always did something a little different with either the background or construction and did not always follow her pattern but the finished quilt always looked the way Sandra designed it.  I promised Sandra that I would be a good pattern tester and would follow her instructions completely.  I chose to make my Shine quilt with Carrie Bloomston’s Wish fabric line with Ruby Star Society Spark fabric for the background.  I chose this for the background since I thought the Silver Gray fabric would help the letters and stars stand out and also I wanted a background fabric with a little detail to make up for the inevitable lackluster quilting.
This is the first time I had the opportunity to be a Pattern Tester and I took this task very seriously.  I read the cutting directions very carefully to make sure it was accurate.  I did order an extra half yard of the background just to make sure I had enough in case I made an error cutting or in this case my iron acted up and splashed rusty water while I was ironing it and ruined a quarter yard.  Thankfully I still had enough.
It didn’t take me to long to break my promise to make the quilt according to her instructions.  Sandra let me deviate from her Flying Geese method since I like to make them using my die-cutter and that was the only time I “misbehaved”. 
I wished I could had a video of me sitting by the sewing machine, concentrating on following the instruction with my finger running over each line to make sure the patches were sewn together correctly and then lifting my head up and staring into space when I realized then that I wasn’t a Pattern Tester but Sandra gave me a pattern test to see if I could really focus and follow her instructions. This happened when the patches were almost all sewn together into blocks. Talk about getting schooled for my “bad” QAL behavior.  At least the “test” was easy and also very fun to sew, I’m not saying this for extra credit.
I think I passed and learned some patience in sewing the top together.  I’m never one for pinning rows together but for this quilt I did to make sure they lined up.  Funny fact about the making of the top was I was really tempted to only finish the left half of the quilt since I thought that the Shine panel would make a nice banner especially for a classroom but my determination to be a good “Pattern Tester” prevailed. Also, I like to mentioned that this is the first time I ever pieced letters and really enjoyed making them.  I even told Sandra she has to come up with the rest of the alphabet.

Once the straight line quilting of 5/8” apart started, it was a breeze, no pinches or puckers.  It was really nice using Aurifil thread for both the piecing and quilting.  I really thought the straight lines would be boring but I think it gives the quilt a nice graphic look.
While I was machine quilting, I was listening to “The Gown: A Novel of the Royal Wedding” by Jennifer Robson which was recommended by Wendy of Pieceful Thoughts.  It’s a story about the embroiderers who worked on the wedding dress which inspired me to embroidered some of the stars around the flame with yellow floss. 

The backing was yardage of a gray dotted fabric I had in my stash which I love when that happens.  I originally wanted to bind the quilt with the same solid yellow fabric as the small stars but decided the gray and white geometric print would accent the colors of the quilt better; the yellow would have been overwhelming.
Shine was a Finally Finish this past weekend and of course rain was in the forecast so I didn’t think I would be able to post until later this week. Surprisingly the sun was shining on Labor Day and we had the opportunity to go to a friend’s house which has acreage to gather acorns for my squirrels.  I brought along Shine so I could take photos of it amongst the trees and, of course, with Honest John, the twelve-foot road sign on the property.  They look good together don’t they?

Here is the Link to the Shine Pattern which is available to purchase from Sandra’s Etsy Shop.  This is not an affiliate link and just wanted you to know where you can purchase this fun pattern. I still am tempted to make just the Shine panel which would make a nice door quilt or a banner for a future classroom.

It’ll be a few more days before we leave for the Grandparent House and my Shine Quilt will be living there now in the darling Granddaughter’s bedroom.  I’ve already made her another Patchwork Blankie which I will share on my next Post along with other projects done during the rest of September.  It seems like Summer is leaving us too soon. Hope everyone stays healthy and happy.

Sunday, September 1, 2019

The Big Easy #1: 16" Blocks with Carrie Bloomston Fabrics

A perfect quilt sewing week for me is to have my blocks ready to sew together, layout determined, top made, backing and basting done, machine quilting and binding done without a hitch; a finally finish in the matter of a few days with no magical twitching of my nose involved. And it happened with my Big Easy #1 quilt.  I've been planning on making this quilt with my stash of Carrie Bloomston fabrics since April when I used some of it for my Beothuk Star Quilt.  After playing with this fabric and then deciding on the five fabrics used for this quilt, I knew I wanted to make another quilt with these fabrics soon. I've been buying Carrie Bloomston (Such Designs for Windham) fabrics for six years now starting with her first collection Collage and her subsequent lines; Paint, Story, Dreamer and her latest Wonder, some of each of these fabrics lines are in The Big Easy #1.  I just love everything about Carrie's fabrics, the colors, the patterns, the many texts, the big, medium and small scale prints and that each fabric line work well with each other.  

Coming up with the pattern was easy after looking at the prints and deciding big blocks were needed in order to show off the prints.  Once again I used my trusty graph paper after I decided that a variety of 16" finished blocks would be perfect for the Carrie fabrics with its different scales and patterns. I started with fourteen different blocks and added a few different ones later while I was assembling the blocks so the pattern shown here is not what The Big Easy #1 ended up being.


Depending upon the fabric, they were cut either in 8-1/2", 4-1/2" and 2-1/2" strips.  The 2-1/2" strips were sewn together for the different size of rail blocks needed.  After these strips were sewn and the 8-1/2" and 4-1/2" strips cut to size, the blocks were ready to be assembled. The rail strips were not cut until they were paired with the other patches in the block.
Each block was individually laid out on the design and the patches were not sewn together until all of the blocks were laid out.  I think this fluid way of assembling the blocks and doing the layout at the same time helped me to make sure the colors and patterns were evenly distributed and it was while doing this I came up with some additional block patterns.  

Once I was happy with the layout, surprisingly there were maybe one or two changes, the blocks were ready to be sewn  together and then the top.
I couldn't decide until the next day whether I wanted to do straight line or curvy line quilting and then came up with alternating the two and am very happy with the way it turned out.  I used Connecting Threads/Essential Threads in Parchment.
There was no question as to what to use for the backing which was the last yardage I had of Carrie Bloomston's popular and famous Newsprint, 108" width.  The binding, which is the only fabric that is not from her line, was also the last piece of Lakehouse Two-Tone Mini Check in black and gray which was the perfect accent fabric to go with all of the different prints in this quilt.  
The Big Easy #1 measures approximately 64" x 80".  If you're wondering about the name, I thought it was appropriate since the blocks were big and this quilt was so easy to make plus it's getting harder coming up with names. I know there are going to be other big easy quilts to make from my stash and just changing the number is so much simpler than coming up with a new name.  Now I understand why George Foreman named his sons George I, George II, etc.  I'm looking forward to curling up with this quilt, I won't need a book to read since there are so many texts and I keep finding new ones the more I look at this quilt.
Just a reminder that Tuesday, September 3rd is the start of the 2019 Online Quilters Meet & Greet hosted by Benita Skinner of Victoriana Quilts and I will be participating.  I will be posting on this day  to give you the links to Benita's website to you can visit the other quilt bloggers who are participating and enter into the drawing for some great prizes being offered.

Thursday, August 22, 2019

The Baby Arturo Quilt and More

This is highly unusual for me to have three quilt Finally Finishes and two posts in one week.  I debated about whether I should write a post about this baby quilt which I abandoned back in July in order to play with the scraps I received from Mary which ended up being the two quilts I posted about earlier.  I was just going to post a photo of this quilt in my 2019 Quilt page in my blog, but I thought better to provide some information so that I have some sort of record of this quilt finish.

This quilt measures 40" X 45" and was made from the Ginger's Thicket Critter Panel along with some yardage from that collection and a few others from my stash.  Susan of PatchworknPlay also made a baby quilt using the same fabric collection and also used an accent of a minty green fabric which I liked.  I found this minty green fabric while vacation earlier this year and is one of the few pieces I purchased during my year of the Fabric Fast.

I have to admit I did not enjoy the quilting as much as I did with the earlier quilts I just quilted.  I always seem to have a problem when I combine straight lines with diagonal lines and there was more puckering than a kissing booth in the corners.  Like we quilters like to say, "finish is better than perfect".

As for why the quilt was named "Arturo", it's a little tongue in cheek.  My friend Mary had a grandson born in May/June and this is the third child of her oldest daughter and her first grandson.  I don't know what it is but this grandchild I know little about since info doesn't seem as much as the other two.  I don't remember the baby's name and only seen it once on FB and not as many photos.  I didn't even receive a birth announcement.  Knowing that the other siblings' names began with the letter "A", I decided to call it Arturo since I like to name my quilts.  Hopefully, I will see Mary at the end of the month being that's when her birthday is so I can give her this quilt and know more about this sweet baby boy.
Now that the baby quilt is a finish, I had the joy of deciding what my next project was going to be which I first chose another strippy quilt with the Carrie Bloomston fabrics which are on the right.  But lo and behold I got sidetracked with another project when my little stash of Downton Abbey fabrics  on the left caught my eye and I knew I wanted to make a lap quilt just for the movie which is coming out in September.  You've seen those ads on FB and IG haven't you?  The whole family is excited about seeing this movie, even Demando.  Sadly with the little fabric I have, this quilt is going to be too small to share so maybe the theater won't be so cold for the menfolk.
I'm posting this right before I'm going for another visit to see my precious granddaughter so I may not be posting again for awhile since these visits tend to take precedent over any quilt finishes.  I'm having the same problems again of not receiving notifications of comments left on my blog so I apologize for any delays in responding. 

Linking up with My Quilt Infatuation NTT

Thursday, June 13, 2019

Beothuk Star QAL-Celebrating a Famous Canadian's Birthday

If there isn't already enough birthday and holiday celebrations this month at my house with my birthday on the 14th, Father's Day on the 16th, Demando's birthday on the 18th and Granddoggie Daisy's on the 20th (it's like cake every other day-yum!), I also have a famous Canadian's Birthday, aka, Sandra, mmmi Quilts' father,  to celebrate on the 15th.  And there's no better way than to do this is by finally finishing my Beothuk Star Quilt in time for the celebration/Linky Party.


Depending on how you look at this, I've either completed the Trifecta or the Quadalupe of QALs hosted by Sandra, mmm! Quilts; nevertheless I've done them all and finally finished all them on time.  What I love about participating in Sandra's QAL is that I always used fabric from my stash plus her patterns make great use of my die cutter.  Also adding to the mmm-merriment are the wonderful sponsors she lines up. There's always ample time to construct the quilt but I've found that once you start the quilt you just can't stop, just like a good snack.

When the Beothuk Star QAL started back on April 3rd, I initially chose the fabric on the left but decided the fabric on the right would be better because of the stronger contrast.  Both fabric choices are Carrie Bloomston fabric lines.  With the exception of the Postcard from Sweden QAL, I once again improvised my background fabric by adding another print since I didn't have enough of the one print.  You can see that I added the khaki tan newsprint to go with the white newsprint which I think helped define the stars nicely.  It wasn't until the top was sewn that I saw my colors well represented the theme of the Beothuk Star being the red was for the Beothuk or Red Indian Tribe, blue for their spirit, yellow for their strength/hope, tan for the land/Earth and newsprint for the words that always need to be said or read to keep their memory/history alive albeit how painful it may be.  You can read Sandra's backstory of the Beothuk Star here.

I've already confessed to Sandra that I did not construct my quilt according to her thorough instructions since I used my die-cutter. So 3"x6" finished flying geese were made in place of some of the 3" half triangles and my quilt was constructed row by row but you wouldn't know it if I haven't mentioned it.   You can see that I was rather the daredevil by basting the quilt with straight pins and only having maybe one inch of batting/backing on all four sides.  I survived the numerous pricks on the fingers and hated it when the pins snagged against my legs. But the quilting was done under two hours.
One of the reasons why I chose to use the newsprint, besides it being very interesting, is that I could do KISS (Keep It Simple Sunshine) quilting by just doing quilting in the ditch and some diagonal quilting.  The Newsprint fabric is one of my favorite and I was very stingy in not wanting to use it for the backing so I used a tone on tone tan print which I won't bore you with a photo.  Really, I just forgot to take a photo of the back.  The binding was the tan newsprint though I thought of using the yellow fabric but it would have detracted the center star.
When I finished the Beothuk Star quilt Wednesday night, I knew the next day was supposed to be cloudy and rainy so I was thinking my photos for this post were not going to be so great.  Imagine my surprise when the Sun woke me up this morning so I quickly changed and went downstairs to take photos outside.  Since this quilt only measures 42" square, I knew there was no way the Master Quilt Holder was going to be able to crouch down to hide himself behind the quilt.  Thankfully, this past weekend he bought a new power washer for his Father's Day Gift, (yes, we buy our own gifts to avoid disappointment) and I knew the siding outside the front door was just cleaned with his new toy.  Also, I was fortunate enough to have green Frog Tape which I bought after reading Laura's Slice of Pi post about using it to hang up quilts outside on brick or siding, you can read about it here.  So, the quilt was photographed on the siding and it looked so nice.  Even when the wind blew, the green tape still held the quilt up. You can see some of it where the red arrow is pointing.  I think this wall is going to be my new favorite place to hang up my quilts for photographing.
Not to worry, the Master Quilt Holder won't be replaced by this roll of green Frog Tape.  I still going to need him to keep the siding clean with his new favorite friend, the power washer.  We're going have to give it a name.  It's funny that the power washer is the same color as the green tape.

I'm looking forward to joining the other Beothuk Quilts on the birthday of a famous Canadian.  Sandra did a great job with this QAL and I'm looking forward to her next one.  I already put my vote in for her to do one with her Luminous Layers Quilt, you can see it here.  I can tell you right now I'm going to have to find some pretty interesting fabrics to make up for the beautiful quilting that I know I won't be able to do.

Linking up with mmmi Quilts and My Quilt Infatuation, NTT.

Wednesday, April 24, 2019

Jolly Jinny Jungle Quilt--A Finally Finish

It's almost the end of April and this is my first and maybe my only post for this month. April was not the month for time spent quilting but rather too much time spent on getting the taxes prepared and filed and having the pleasure of seeing my Granddaughter, Micah every weekend this month which was the first time this ever happened and I hope it won't be the last time.  There was only two finally finishes for April, this quilt, the Jolly Jinny Jungle (JJJ) quilt and another Chicago Cubs baby quilt which may be another post for another day.  I'm calling this a DrEAMi project even though the JJJ quilt was started almost a year ago last May. It was finally made possible when two quilting forces somehow collided: one being after many years of being gifted these wonderful fabrics (and feeling guilty) from my good quilting friend, Carol,  and the another, Sandra, who hosts the monthly DrEAMi linky party, and who I also refer to as the Master mmmEnabler, thought I could use some yardage of green batik fabrics she was selling for a friend who was destashing, which meant this quilt had to be made. Sandra now has a new title--mmmPetus--yep, she does make things happen.
Good quilting friend Carol and I have known each other for twenty years and we spent some wonderful years working together at a quilt shop and share some of the same tastes in fabrics.  Jinny Beyer fabrics was one of the first line of fabrics we both purchased and there was a time when my quilts always included one of her fabrics. Even though it has been years since Carol and I worked together, we still get together for lunch and even a class with Kaffe Fassett. When we travel, we always buy something for each other since our travels always include going to a quilt shop.  Carol visits her son and family in Virginia so she makes regular stops at Jinny Beyer's quilt shop and most of these fabrics shown above, some Jinny fabrics and some batiks or tone on tones, are from there.  Carol knows that I love green so most of the time my gift of fabric is green.  I've always kept my gifts from Carol in a separate bin in anticipation of one day making a quilt with them.  And if these green fabrics weren't enough, I've already accumulated a lot of green fabrics, in all shades, design, pattern, etc. and I used to always pick up some green when shopping but made myself stop because I have found that whenever I needed a "certain" green for a project, I never had it, so I figured I might as well wait until I needed that "certain" green.
This is a Jinny Beyer print which I had yardage of and I've included plain rectangles of it in the quilt since this ties in all of the different shades of green together.  This piece came with a kit for an ironing pad bag and much as I would have liked to have used it for its intended purpose I really needed to use it for the JJJ quilt.  Carol would understand and this isn't the first time I've raided a kit. I like to name my quilts and the only problem I had this time was choosing which one I came up with in the course of eleven months. Since starting this quilt, I've changed it several times; the first name that came into mind was Postcards from Carol, since at that time I was finishing up my Postcards from Sweden QAL quilt and then there was How Green Is My Quilt, since this is a very green quilt but I finally settled on Jolly Jinny Jungle.  The Jolly is for the Jolly Green Giant and all of the Ho, Ho, Ho, Green Quilt which my mind was saying/singing, Jinny because I just had to include her very cool name and Jungle just because I like alliteration in my quilt names and Tarzan wasn't going to work.

So to give a timeline as to the making of the JJJ quilt, after the backing was received was Sandra, I drew up a design of HRTs, since I like the look of HRTs and could die-cut them and rectangles on graph paper.  The design was helpful for me to determine the color combinations and how many HRTs to die cut and rectangles to rotary cut. The patches were sewn together from last May through June and then sat in the basket until November when the HRTs and rectangles were sewn together into 6" x 12"(f) blocks which may have gotten done because this was one of the projects I could sew while recuperating from last Fall's fractured knee.
After the blocks rested for another four months, I finally finished the top at the very end of March.  The quilt measures 54" x 72".  I ended up not following my design exactly and just letting the blocks decide where they wanted to go.
The machine quilting was organic, curvy waves approximately .75" apart and the thread was a bright Olive Green which is no longer available from Connecting Threads.  The binding is yardage from Gail Kessler's Dimple line and after looking through my four bins of green I was getting afraid of not having that "certain" green and glad I found something which went with the quilt.  I'm still not a big fan of scrappy binding as well as scrappy backing.
And this is the backing I pieced from the yardage purchased via Sandra.  I knew when I saw it that it would work with the other green fabrics.

In case, you noticed that there was too much fingers showing in the holding up of this quilt, it's because the Master Quilt Holder was busy barbequing and I wanted to take photos while the Sun was still out.  The Apprentice Quilt Holder, aka Demando, was asked to take the photos while I held up the quilt and it was not easy especially when the Apprentice is taking time doing selfies and photos of his sidekick, Duke.  I so appreciate the Master Quilt Holder now and understand his complaints that holding up quilts wasn't easy.  I also feel bad for the times I took my time taking photos because I wanted to drive my point of wanting a clothes line.  And if you're wondering why the Apprentice didn't hold up the quilt, as mentioned before, the Sun was still going strong at 6pm and if I had asked him to hold up the quilt, he would have complained until the Sun did go down, thus ruining the photo op. I don't think he's ever going to be a Master like his father so that's another reason for my needing a clothesline.

BTW: last year, Carol and I came to an agreement/understanding which may have been initiated by me not to buy each other any more "gifts" but leave it to her to already break it.  We're meeting for lunch soon and she mentioned that there was a little something from Jinny.  I hope it goes with the other fabrics I still have in my gift stash.

Sandra's newest QAL, Beothuk Stars, has just started and I'll need to do some catch-up when I return from my one-week visit with Micah who's doing a great job of grandparent sitting. I'm looking forward to making this quilt since I'm using Carrie Bloomston fabrics which I've been accumulating for awhile now--no Carol involvement this time, but yes for Sandra for being an mmmPetus.