Friday, June 30, 2023

Rainbow Neighbourhood QAL Parade/Glass Houses

Today is the Rainbow Neighbourhood QAL Parade hosted by Sandra, mmm quilts. This is the 7th QAL of Sandra’s which I have participated in and this year’s pattern was again a fun make. I previously posted about my progress on April 1st, which was the start of the QAL and then on April 10th when my nine blocks were finished. It was nice to have 2.5 months to finally finish my Glass Houses Quilt, so named because I used Allison Glass fabrics, although I waited until the last week to finally finish it. 
Part of the delay was due to two vacations and several trips to the GP House and my indecision on whether I wanted to machine quilt with vertical straight lines, my first choice, or horizontal wavey lines. As you can see, the vertical straight lines, 1” apart, was decided. Since Glass Houses is going to be a wall hanging, I thought the straight lines would add a more graphic look but used #3817 variegated Aurifil thread so the quilting wouldn’t look too stark. The binding is the same black Cross Stitch fabric used in the sashing. My original plan was to used the multi-color print as in the cornerstones for the binding but after machine quilting, I realized it needed to be the same fabric as the sashing to better frame Glass Houses.
If you read my Previous Post about becoming a happy pieced backer now, I had to make one for Glass Houses since I had three leftover quilt blocks made with Allison Glass fabrics from my Ernie Express Quilt #2. This is my third piece quilt back and I’m now at the stage in which I feel guilty if I don’t make one. Normally, for a wall hanging I prefer the backing to be the same fabric and light colored too.
Glass Houses was finished four days before the parade and we’re having iffy pic-taking weather besides unprecedented poor air quality with heavy smoke from the Canadian Wildfires both here and at the GP House. The front bench was moved so Glass Houses, Petal Pop and Ernie Express #2 can be taken together as this is going to be the darling Granddaughter’s new bedroom ensemble at the GP House. The Master Quilter Holder was glad to be standing behind the bench so he didn’t have to crouch down to hold the 54” square quilt but he did have to hold it up as high as he could which wasn’t too much easier.
I had fun with this year’s Collage of all the quilts I made to Celebrate A Famous Canadian’s Birthday. While I was making Glass Houses, I was thinking that this would be the 7th one which is a lucky number and Sandra must also have some sort of magical powers for me to participate in all seven of her QALs plus making other patterns of her’s. I like to come up with “mmm” names for her and “magnificent” came to mind which quickly changed to “Maleficent” the powerful fairy in Sleeping Beauty. Note Maleficent is a fairy, albeit a powerful one, and not a witch or as I say magically wicked which makes “mmmicked” a fun word, don’t you think? So, I thought it would be “mmmicked to add a graphic to this year’s Collage which was  easy for me to come up with my MMMaleficent. All I needed was to grab Sandra’ blog photo, which is very nice by the way, then the Maleficent pic with Angeline Jolie, apply a few apps like PicMonkey and Voila AI Artist and then iPhone photo editing to draw the hair and make the lips red on my iPhone. Fun, right? I thought I should explain this so Sandra doesn’t think this graphic was already available on the Web, although I wouldn’t have been surprised if it was.
The Rainbow Neighbourhood theme was very fitting for this year (one last pic of Glass Houses amongst an actual rainbow neighborhood in Allentown/Buffalo thanks to Google and picMonkey). I want to thank Sandra again for another wonderful QAL and if she isn’t going to banish or turn me into a mouse, I look forward to participating again next year.  I’m sure it will be mmmagically fun.

Wishing every one a safe and Happy Fourth.

Wednesday, June 21, 2023

Perfectly Pieced Quilt Backs Book Review and Book Blog Hop/Unruly Safari Moon

Today is the book launch  of Perfectly Pieced Quilt Backs, the latest book by Kelly Young, My Quilt Infatuation. I was asked back in March if I would be interested in reviewing her book by making one of the thirty patterns designed specifically for quilt backs and participating in her Book Blog Hop. It was a  Big Yes from me. Kelly wrote the book for Quilters, like me, who aren’t comfortable with making pieced quilt backs or for those Quilters, definitely not me, who need new pieced quilt back ideas. 

It was rather serendipitous that I would be asked because around that time I was thinking my scrap fabric overload was caused by having too much leftover after a quilt finish and that I maybe ought to start making pieced backs which is something I avoid like catching Covid. Also at that time, Linda, Texas Quilt Gal, had posted about her latest quilt being a mullet quilt and since it didn’t remind me of Billy Ray Cyrus, I had to find out what she meant by that. Well, I learned that a mullet quilt means that the business or the seriousness is in the front and the party is in the back which I take it to mean the back of the quilt has the more “fun” fabric or approach. My quilt backs tend to be on the quiet or bland side and not much time is spent planning or making it, so in the terms of a mullet quilt, my backs are definitely party poopers. When I first started quilting over 25 years ago, quilt backs were not important to me, I didn’t want to use the same fabrics as in the front, especially at that time $9/yard and I used a fabric purchased on sale which is the reason for my backing fabric vault. Another caveat I had for backing was that it had to somewhat complement the top and not look like I sewed any old fabric(s) together.  

I was thinking the reason why Kelly asked me to participate in her Book Blog Hop was because several years I participated in her Book Blog Tour of Scrappy Improv Quilting but then I realized that she may have seen some of my backs and sensed that I needed to stop being a pieced back resister and come over to the party side. Like Kelly saids, she has your back.
It was no surprise for me to that Perfectly Pieced Quilt Backs is just as inspiring and resourceful as Kelly’s previous two books, Scrappy Improv Quilting and Stash Statement.  It definitely is a Scrap-Smart Guide. The thirty patterns are divided into three sections depending on whether you want to use Small Scraps, Medium Scraps or Large or Mixed-Sized Scraps/Fat Quarters. It may have exceeded my expectations being that as you read my Post, I have been converted to a happy pieced backer and my days of whining and resisting are over. Planning  a quilt back beforehand and not as an afterthought is the way for me to sew now. As Kelly mentioned in her book,  a pieced back adds a little something extra or lagniappe as the French would say.
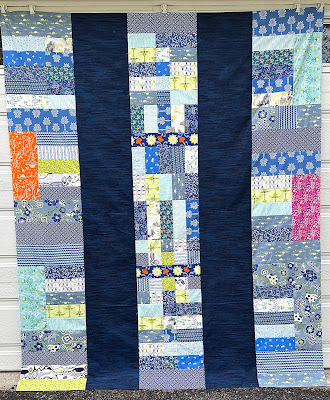
From the thirty patterns presented in Perfectly Pieced Quilt Backs, I chose to make the Double Bar pattern, page 64, because it made the best use of my leftover blocks and scraps which were large or mixed-sized scraps and fat quarters.I just needed to purchase yardage of the dark blue fabric.
The leftover blocks and scraps were from my Safari Moon  quilt using a modified version of Kelly’s Unruly Pattern (not an affiliate link) and I made especially for the book blog hop. We had a choice of either making a quilt back for an existing flimsy or just a simple top but I saw it as another reason to make another Unruly quilt as it is one of my favorite patterns.  I was planning on making this quilt and have been stashing the fabrics for several years now. 
The name of this quilt is also the name of the Art Gallery fabric line designed by Frances Newcombe which I had yardage and fat quarters of the wonderful prints. I modified the Unruly pattern so I could feature the Zebra and some of the other larger prints. Little did I realize that this would also be enough to use for the pieced backing and it helped that I originally made thirty blocks and decided to only use twenty blocks.
Three Quilt Backing Sizes (Lap (72” square), Twin XL (80”x108”) and Queen (96”x108”) are given for each of the thirty Quilt Back patterns. You can easily modify the dimension to fit your quilt which is what I did for the Double Bar pattern since my top measured 60” x 75” and I needed a backing to measure 68”x 83”. Using leftover blocks and scraps, I made three panels measuring 15-1/2” wide by 83”long and I cut the solid blue fabric 12-1/2” wide by 83” long. 

I should point out that I may have made a mistake with the block panels made for the sides. I thought I was being smart for putting the bright rectangles vertically to avoid having too many seams on the outside but you can see once the backing was trimmed, these bright rectangles were almost cut off just leaving skinny pieces on the sides. At first I thought it was awkward looking but then as Kelly pointed out in her book, you are not making double sided quilt, to which I add, you still want to be able to tell which side is the front and which one is the back. Although my back is pretty, it still looks like the back but Unruly Safari Moon does have two-sided appeal.

Some of the things I learned from Perfectly Pieced Quilt Backs are:
  • Patience as I used to think sewing a pieced quilt back was like sewing another top but it’s really not because you may just spend an hour piecing scraps and to me is it makes for a nicer finish. Rather than seeing the top and backing as two separate pieces, there is a connection now between the two with a pieced quilt back.
  • I was making my quilt backs too large as I was using the measurement of adding 8” to both the wide and length which is what you do if you were sending it out to a long armer which I do not do 99.5% of the time. I can get by with just adding 4-6” on both sides now that I’m…..
  • Taking the time to measure both the quilt top, batting and backing and marking the center of each piece in both directions.
  • I am no longer eye-balling centering the backing on my big 48”x76” table where I baste my quilts since I have now marked the centers on the table.
  • More confidence and less stress now that the layers of the top, batting and backing are centered and no surprises if one of the layers is  too close to the edge after the majority of the pin-basting is done. I may have been surprised more than once and salty language was definitely used.
  • Making pieced backs is fun and using up leftover fabrics does feel good.
Here’s a pic of the leftovers which could have been more if I hadn’t made a pieced back. This is  enough to make a pillow to go with Unruly Safari Moon. A fun thought is to send these to Kelly so she has an idea for her next book like When Quilt Friends Give You Scraps.
And just to show how much Perfectly Pieced Quilt Backs converted or inspired me, after I finished Unruly Safari Moon, I made a pieced back for my Sushi Shuffle Quilt. It is a version of the Double Bar pattern but with only one pieced panel in the center. 

Sandra @mmm quilts
Diann @ Little Penguin Quilts
Laura @Slice of Pi Quilts
Jayne @Twiggy and Opal
Anja @ Anja Quilts
Nancy @Grace and Peace Quilting
Vasudha @Storied Quilts
Kris @Sew Sunshine
Leanne @Devoted Quilter
Rebecca @Rebecca Grace Quilting
Preeti @Sew Preeti Quilts
Susan @Quilt Fabrication
Kate @Katie Mae Quilts
Sarah @Sarah Goer Quilts
Linda @Flourishing Palms
Anne-Marie @Stories From The Sewing Room
Michelle @From Bolt to Beauty
Gail @Quilting Gail
Kat @Scrapbox Quilts
Julie @Julie’s Quilts and Costumes
Jan @The Colorful Fabricholic
Rose @something rosemade (that’s me!)

There are twenty-two (including me) Quilt Bloggers who are joining in the Perfectly Pieced Quilt  Backs Blog Hop by reviewing this book and making a pieced quilt which I can bet theirs’ will be perfect. We are all posting today so be sure  to check out their posts by clicking the links on Kelly’s Book Launch Blog Hop Post.
Besides the thirty quilt back patterns in Perfectly Pieced Quilt Backs, when you purchase this book, you will be able to download 18 bonus quilt patterns for the tops which went with the quilt backings. I already have a collection of Kelly’s patterns (I already made her Tinkering quilt, which I named Kaleidoscope Krosswalk) and to think I now have 18 more just make this book so worthwhile to purchase.  Kelly’s patterns are fun and easy to sew. There are already a few that I want to check out the pattern because I may already have the fabric. I will say now that most of the quilt back patterns I would consider making them as tops. (Please note that the Unruly Pattern is NOT one of the 18 bonus patterns but is a pattern so worth purchasing—not an affiliate mention). You can purchased this book directly from Kelly, through Etsy, which you will receive a signed copy or from Amazon Prime, Barnes and Noble, Connecting Threads, Missouri Quilt Co. and Fat Quarter Shop. (Not an affiliate link).
Just some closing “glamour” pics from of Unruly Safari Moon quilt, front and pieced back which I enjoyed making for the Book Blog Hop. I want to thank Kelly for inviting me again to participate in promoting her latest book. You are always an inspiration to me.  Perfectly Pieced Quilt Backs is definitely a book you would want to have in your library and maybe you want to mention it to Pieced Back Resisters or Party Poopers which I am happy to say that I’m no longer a member of this group.

Wednesday, June 7, 2023

Remembering Ernie, My Quilt Muse

On our way to Colorado last week, we stopped in Iowa to visit Mary Etherington, Country Threads, which we usually do when traveling West.  A visit always includes spending time with her four-legged babies. I was able to take a picture of Ernie, her American Farm Tiger, who during this visit, was very receptive to some scratching and petting from me, which was unusual. Mary mentioned that Ernie was not himself and was worried. I was so sad  to receive an E-mail several days later that Ernie had crossed the Rainbow Bridge. A lovely Post by Mary about Life Without Ernie can be read here. I had to write a post about Ernie who was the inspiration for the many Ernie quilts I have made since 2016 which was the time I started blogging. My Ernie Journey about the making of these quilts was one of my first Posts. 
In this Post, I wrote about Mary making a quilt top with a Denyse Schmitz Jelly Roll and I had given her the backing which was an Orange Cat print purchased from IKEA which reminded me of Ernie so we named her quilt the Ernie Quilt. This quilt was the inspiration for my Ernie quilts and is a very versatile rail fence pattern made with 2.5” strips.
I’ve made  thirteen versions of the Ernie Quilt and is one of my favorite patterns and one that I always love making. It’s an easy make plus a quick finish with straight line quilting. The one I made with Kaffe Fassett’s Shot Cottons and Woven Stripes (lower right corner) is my most popular quilt on my blog with over 10,000 views.
Here’s a photo taken several years ago of Mary with Ernie, the Quilt Muse with my Ernie Express Quilt II. I was fortunate to have several of my Ernie Quilts be blessed by him.
And here is one of me holding Ernie in 2016 and he was one big dude. Mary and I are thinking we could remember Ernie by making an Ernie Quilt on National Sew A Jelly Roll Day which is “celebrated” every third Saturday in September.  I think this would be a wonderful way  for me to thank Ernie for bringing me so much quilt joy.

Friday, May 26, 2023

Sushi Shuffle

In between two projects which were “must-dos”, I managed to squeeze in making Sushi Shuffle a “shouldn’t be doing” which some would say is a “dream” but for me turned into a scream because that’s what Quilt Karma does sometimes, especially to my aging Asian mind. I was tempted to name my latest quilt Screaming Sushi but thought Sushi Shuffle would give a better image.
Anyhoot, while I putting away my fabric purchases made from last month’s Maine vacation, I purchased yardage of the black/gray/white Stof print (lower left corner). I knew I could use it  as backing for a quilt I would someday make with the other Stof prints which are stored  in my box of Teal fabrics. For such a small box, this has been a start of many quilts made as I mentioned in this Post. And wouldn’t you know just opening this box inspired me again to make the Sushi Quilt so I stopped working on my secret project.
No surprise that I wanted to make another Staggered Strips and Brick quilt with my initial fabric pull. Except for the black prints, the other prints were stored with the Teal stash. I knew someday I would make a quilt using the two fish prints on the left which were the color inspiration for the quilt. I did end up pulling some more gray and taupe prints because you can never have too much fabric when making a Staggered Strip quilt.
I decided that the Sushi Shuffle quilt would have (4) panels measuring 8”x72” each of staggered strips and three panels of 4”x8” blocks each also measuring 8”x72” since I wanted to feature the Stof prints purchased almost five years to the day from The Fabric Nook in Granby, CO which are the green and black and the gray and black print. I had to find some other prints which would complement the Stof  prints and was lucky to find the black/taupe which is by Basic Grey and from the Basic collection. Even luckier was finding the wonderful Stof print I didn’t remember purchasing, on the right and it wasn’t with the Teal box but with low volume prints. The orange Fish print is a Moda print which was stored in the Teal box. Have you notice my use of “the Teal Box”? I normally would refer this as my Teal Stash, but after making Sushi Shuffle, I’m thinking it’s like Pandora Box, not evil, but it does unleash sometimes untimely inspirations.
I really thought the Sushi Shuffle was going to be an easy and quick make and was I wrong as soon as this crossed my mind. I had to include a photo showing the seven panels so you understand how this quilt went from a dream” to a “scream”. First of all, I thought I was being smart by remembering that the strip panels needed to be on the sides of the block panels because I don’t like the way it looks when the blocks are on the outside. I also was going to add strip panels on the top and bottom but remembered that I don’t do this when the strip panels are vertical.  When making lap size quilts, I like at least an 80” length since we are a tall family and  now would have to settle for a 72” length since I already cut them this length before remembering I should have cut them 80”. But what really started the screaming was when I was sewing the two panels, what should have been the final seam, one with #1-#4 with #5-#7 and it did not line up. It seems that whenever I make a vertical Staggered Strip quilt there is always a problem with the panels lining up evenly and salty language is always used.  This time there was a 1” difference and I had to take the two panels apart. I thought maybe the solution was to also take apart panels #4-#7 and resew them back together.
I was so happy after ripping out two long seams that the panels lined up (left photo) but there was a problem. I don’t know how I did this but panels #4 and #6 were switched and finally corrected it after ripping more seams apart like three-four times, I lost count (right photo). I will say that this was not the original layout since panel #1 and #7  somehow got switched in all of the shuffling. If you’re wondering how I came up with the name Sushi Shuffle, I did want a name that tied in with the fish prints but really settled on Sushi because I was saying the four-letter “S” word a lot, especially after realizing I had to rip seams out again and again. Sushi is a nice alternative word for a swear word to use especially around the darling Granddaughter. And Shuffle was what I did and I do like alliteration when naming my quilts. I did mention before Screaming Sushi was in the running but also Senile Strips because I had to be with the many times I sewed the panels together wrong.
I did end up sewing panels on the top and bottom and wonders of miracles I sewed them in the correct spot. I really did want this top to be 80” long and since the panels were already made I decided to add them. I do like the way this looks. After the flimsy was  made, I did set it aside for the secret project that needed to be finished.
It’s no secret now that I am participating in the book launch blog hop for Kelly Young’s, My Quilt Infatuation, latest book “Perfectly Pieced Quilt Backs which will be released on June 21st. My quilt made for this book launch is a Finally Finished and I am very excited to share it along with the other quilters who are participating in this book launch. This is another great book by Kelly and has converted this once pieced-back resister.
And to show how inspiring the book is, instead of backing Sushi Shuffle with just the black and gray Stof fabric which was my original intention when I bought the fabric, I did a pieced backing using the leftover strip panels and fabric chunks. The way I see it, I needed to use up the scraps, as encouraged in “Perfectly Pieced Quilt Backs” and not put them away in the Teal Box because I don’t need another future project. I plan on staying away from this box for awhile. It feels good to spend just a little more time and thought into my quilt backings and making it a nicer Finally Finished.
Here’s are close-up pics of the machine quilting with straight and wavy lines using CT Essential Thread in Stone The binding done by machine was with the Basic Grey black and taupe print. Sushi Shuffle measures 56” x 80” (approx.)
I always like to close my posts with a “glamour” shot of the quilt and thought Sushi Shuffle would look nice in front of a Sushi restaurant. Unfortunately, there isn’t one close by so this one is made possible by PicMonkey. The colors in this quilt does go with the restaurant, doesn’t it? Knowing the reason why I’m using Sushi, I didn’t think it would be pretty if I used a photo of Outhouses, right?  Now that my May Misbehaving may be over, it’s time to put together my flimsy for my other mmmust-do, the Rainbow Neighborhood QAL parade scheduled for the end of June. We’ll be leaving soon for a vacation in the mountains and I’ll be visiting The Fabric Nook to see if they have more Stof fabrics to add to the Teal Box.

Wishing everyone a Safe and Happy Memorial Day Holiday.

Linking up with:My Quilt Infatuation/NTT

Sunday, April 30, 2023

April Amazement

Despite being away from home for a total of fifteen days in April due to a Maine vacation and going to the GP House several times,  I was not expecting to have a Finally Finished this month. This past week when we were done with our travels, I worked on a somewhat secret project for one of my favorite Quilt Designer’s new book launch for early June. I thought if I was going to properly participate, I needed to first sew a top using one of my favorite patterns designed by her. I finished the flimsy this past Friday afternoon, several hours before dinner and thought I could possibly have a flimsy finish for April’s Country Thread Dirty Dozen UFO Challenge. I was thinking that I was going to skip doing a project this month but when you soon realized that there was still time, the Peaceful Kingdom Cabin Fever quilt was a big finish last night and amazing for several reasons.
I’ve been saving this group of fabrics for several years now and been waiting for a pattern which would showcase the Rae Ritchie by Dear Stella print on the left. I don’t know the name of this print and since it’s more than several years old and thinking I may have purchased it for a baby quilt for the darling granddaughter who is now six years old, I’m calling it Peaceful Kingdom since the orange tiger and deers are co-existing rather peacefully in the pretty landscape. Rae Ritchie prints are always interesting and the colors in this print are fun. Before deciding on a pattern, I’ve been accumulating prints from recent purchases and from stash. I was quite pleased when I finally put these group of fabrics together on the right which are Cotton+Steel, two Bonnie Christine prints (the mint green circles and yellow alphabet), the rose pink dots from Clothworks and the blue dotted line is from Blend’s The Adventurers. When I make a quilt with less than ten different fabrics, I think the colors need to snap together or match perfectly which means sometimes the fabrics need to be from one fabric line but with this quilt using different fabric lines made it fun and happy.
I’ve been buying/collecting Villa Rosa Design quilt pattern cards since 2011 when they first came out and now have almost thirty pattern cards which includes the ones from Pineapple Studio. I always like buying these  cards (not an affiliate link) since they can be inspiring for quick and easy makes plus you can’t beat the price. I can honestly say though, I have never made a quilt using one of these pattern cards until now.  When I decided to finally make something with my Peaceful Kingdom fabric grouping, I knew I could use one of the pattern cards and the Cabin Fever pattern by Running Doe was perfect. Thankfully I purchased this card back in January when two of my Bee Sistas ( Wendy and Kathleen) participated in a Villa Rosa Design QAL and seventeen of these cards arrived at my house. (With this many new cards, I better have found a pattern, don’t you think? What can I say- $2 each, free shipping plus an app to tell you which pattern cards you own-I just have to remember Rose Cards means Villa Rosa Design pattern list and not my list-confusing, right?)
Anyhoot, Peaceful Cabin Fever (I have to be careful typing Peaceful since I sometimes mix-it up by typing Pieceful as in Wendy’s Blog)  although it was Pieceful with the cutting and sewing of the flimsy completed way under two hours.
Imagine my surprise when I thought Saturday was the first day of May but instead the last day in April which meant I could have a Finally Finished for the month. Horizontal wavy line machine quilting was with Aurifil #2123 (a very pale yellow color), two inches apart which made it fast and easy. The blue Cotton+Steel print was used for the binding and thought I would have to hand sew it since Juki Junebug is semi-retired now. But, with finally purchasing the Even Feed Foot for Jinny Janome, I was able to sew the binding down and it turned out great. Do I dare say, Jinny performed better than Junebug for machine binding?  I’m just glad I can finally machine sew binding down once again. Peaceful Kingdom measures 39”x47”. It’s amazing that the Peaceful Kingdom Cabin Fever Quilt was made slightly over 24 hours, right? And yes, I hummed “Can You Feel the Love Tonight” song from The Lion King even though there was tiger and no lion.
I had two yards of the Rae Ritchie print which I used for the backing although I was tempted to save the leftovers for another Running Doe pattern which I did not purchase although I thought I had the Baby Goose pattern. It would have been perfect also for this print but glad I used it for this quilt instead since this makes it a two sided quilt. I just love this print so much and really should be used for a backing because it’s so pretty and interesting. I had purchased this fabric online and was not disappointed with it once it arrived and started the quest to make something with it. After I had cut the piece needed for the front, it was two inches short for the backing so I sewed two strips of a mint green print on the top and bottom and it’s not too noticeable.  I used  a Pellon Cotton/Poly batting which makes for a puffier than usual quilt, just perfect for a new baby tummy time playmat. I think the Cabin Fever pattern would be great for making tummy time playmat quilts, especially using bright colors and patterns to stimulate the baby. Also, if you need a quick quilt to make for a baby shower, this pattern would be just right.
I thought I give a sneak peek of the flimsy for the upcoming book launch. Could I name it Wild Kingdom? I seem to have a theme this month. I should be home more during May which means I will work on finally finishing my Rainbow Neighborhood Quilt, this secret Quilt plus the May quilt for the Dirty Dozen Challenge. It would be another amazing month if I finish all three since June will be another traveling month.
I thought I would end this Post with a snapshot collage of my Strips Ahoy Quilt, meeting up with Kathleen McMusing and my amazing fabric and one pattern (not a Villa Rosa Design Pattern) purchases all done while in Maine which truly was a wonderful vacation.

Linking up with My Quilt Infatuation/NTT

Monday, April 10, 2023

Glass Houses/Rainbow Neighbourhood QAL/My Blocks Are Finished

The Rainbow Neighbourhood QAL hosted by Sandra of mmm quilts was kicked off last week and just like my usual and previous mode of participating as someone who does not QAL well, I am ahead of schedule by having all nine blocks finished but for good reasons. The thought of not having a finished quilt by the June 30th Parade was not acceptable for me since this would be the first time since participating in the past six QALs that I would only have a flimsy finish. Plus, after making the First Block and like Sandra said, these houses are addicting to sew, especially with my Alison Glass stash and the guidelines/suggestions she made by as how you  can make the houses your own, it was hard for me to make only one house a week, especially with the two vacation planned during the QAL. You can read Sandra’s Rainbow Neighbourhood post Here.

I had already made the first block before reading Sandra’s Rainbow Neighbourhood QAL Kick-Off post and was really excited/inspired with  the many good suggestions she made with how the houses could be made. I swear she read my mind or now can forecast Rebel QAL behavior because I already planned on doing some of them by:
  • Choosing to make only Type 1 and Type 2 houses since they were the simpler of the designs since I didn’t want to cut up too much of the wonderful Alison Glass fabrics. It was fun putting the fabrics together from the yardage, charm squares and scraps from my Ernie Express Quilt #2. My Accuquilt Die-Cutter (no affiliation) was used to cut the squares, rectangles and HST which was made possible with normal measurements meaning there was not eighths or sixteenths. When working with the large scale prints, I did spend some time fussy cutting which is usually not my favorite thing but I do like the results. I have to admit I sure did use my seam ripper a lot, my error or lack of skills and not the pattern.
  • I changed four of the quilt blocks to more simpler blocks. (I really wanted a Heart block for the House in the center.) My earlier problem with the first quilt block not being an accurate 8-1/2” was remedied when I switched from using Jinny Janome to my Juki HZL F600 which has a scant 1/4” foot. 
  • I cut and sewed one block at a time just to stay organized but as you can see below, I work in mmmayhem mode. Another good reason for doing these blocks all at once is that this mess can be cleaned up by putting away the fabrics, die, equipment, etc. I do have some bits and chunks which will make lovely crumb blocks one day.
I can’t decide if  I have a favorite Glass House because I love them all. There’s not one that I’m unhappy  with and am glad they all play well with each other as a Rainbow Neighbourhood should. It feels so good to have these blocks finished before leaving on vacation later this week. I have another project that I’ve already started which needs to be finished by June so I’ll be busy upon my return from vacation.

I can’t say enough how fun these house blocks were to make. I’m thinking of making some more to hang on the door in holiday or seasonal fabrics.  If you haven’t already join the Rainbow Neighbourhood QAL, it’s not too late and it will be easy to get caught up. The pattern (not an affiliate link) can be purchased Here.

Piece/Peace!

Saturday, April 1, 2023

Rainbow Neighbourhood QAL


It’s time to say “Je ne sais QAL” because Sandra, mmmquilts announced her 2023 QAL, Rainbow Neighborhood and, once again, as I have for the past six years, will be participating which is now a rite of Spring and to celebrate her late father, the Famous Canadian, birthday. I had purchased her pattern last December and mentioned to her then that I thought this should be a QAL. As soon as I downloaded the pattern, I printed it which I hardly ever do and it’s been sitting on the studio desk since and knew I could start it once I decided on the fabrics. Imagine my surprise and happiness when Sandra first mentioned the QAL back on March 25th that the Rainbow Neighborhood was the pattern. I was at the GP House which meant the pattern and my stash was at home so I could only think or “mmmull” over my usual reasons for participating. Do I like the pattern, Big Yes, especially since I had the pattern and realized the blocks are 16” and the quilt blocks are 8” and not 4” as I thought they were; can I use fabric from my stash, I’m pretty sure I do but have to wait until I’m at home which won’t be for several days; and since I’m doing the throw size, the schedule for completion is doable since a block a week is sewn until the end of May and then have the month of June to assemble the top for the parade on June 30th. We have two vacations planned during the QAL so the chances of having a finished quilt may be slim but at least you only need a top in order to be eligible to win one of the many great prizes Sandra has lined up. But the main reason for making Rainbow Neighborhood will be explained later at the end of the post.
On the drive home, I decided the fabric I was going to use was my stash of Alison Glass which was the perfect choice since I’ve accumulated stash especially from buying a nice selection of yardage and scraps online from a blogger who was having a destash sale. Once I was finally in my studio I was able to choose the nine colors for my Rainbow Neighborhood along with the background, sashing, border and cornerstones.
I am so happy that I can use my Alison Glass fabrics for Rainbow Neighborhood and I’m having a little tongue in cheek moment by naming my quilt Glass Houses. I have some charm squares for most of the colors and will be using them for the 8” quilt blocks along with the black and white print. The multi-color light print will be used for the sky for each house. I should mention that the yellow green solid is not an Alison Glass print and will be used for the cornerstones. If I do any deviation from the pattern, it will be the sashing and border due to only having one yard of the multi-color black print which I want to use as the border but I don’t like pieced borders which I would have to do since I need at least 60”.

The official start of the Rainbow Neighborhood QAL is April 3rd and I’ve already started after checking with Sandra to see if there was a sequence as to which house to make and there’s not, really. My first block is already done and the cutting and sewing was easy but I need to be better with the quilt blocks measuring 8.5”. I do love that the house blocks are 16” finished, my sewing is much more accurate with large patches. I did press all of the seams open, except for the rows but in the future, will only do it for the 8” quilt blocks. My chimneys did not line up with the roof lines as well as I would have liked so pressing these two rows so the seams will nest might be better. My plan is to make three more blocks before we leave on vacation on the 12th so I will be on schedule once we return.

We did spend half of March at the GP House which the darling Granddaughter did a wonderful job babysitting us and we also celebrated her sixth birthday. Once we were home from our last visit and before I started working on the Rainbow Neighborhood QAL, I did finish my March top for the CountryThreads Dirty Dozen UFO Challenge. My plan is to make this a Patchwork Blankie by backing it with a pink plush which has been hanging around the studio. I wasn’t sure if I wanted to use Jinny Janome since I haven’t sewn plush with her yet and Juki Junebug is stored away in the dining room or the formal sewing room now. BTW, the problems which I had with Juki Junebug could not be fixed by the last shop and they wanted to ship it to shop in Alabama who said they could fix the thread cutter plus the foot pedal problem. I decided I could live with these problems rather than spend any more money. There would be certain quilts, such as this patchwork blankie, that Juki Junebug could still do. It’s just a matter of setting her up on the dining room table which I may be now in a mood to do.

As mentioned earlier in this Post that I had a really good reason for wanting to make Glass Houses, aka, Rainbow Neighborhood is because I thought it would be the perfect wall hanging to go with my Petal Pop quilt which was finished last year. The plan then was that this quilt would be for the darling Granddaughter and now with the perfect wall hanging to go with it, this will be her new bedroom ensemble. After all, she’s now the big “6” and it’s time for a change.