Thursday, February 17, 2022

The New Grandma Quilt

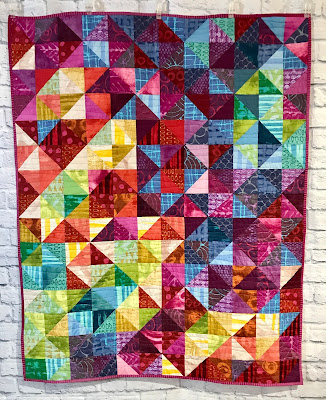
Last week while searching for some backing fabric, I came across an UFO of a Valentine quilt which I started in 2014. I thought with Valentines Day fast approaching and the rail blocks made with 2.5” strips from several Sandy Gervais fabric lines which just needed to be QAYG, I would have a quilt to give to the darling Granddaughter. Whatever I was supposed to do could wait.
There were twelve 18”x20” rail blocks already paired with batting rectangles in which two of them were already quilted. The quilting was done with a pale blush pink thread from CT Essential Thread which has been discontinued. Fortunately, I had kept the spool of thread with this project probably knowing that it was no longer available and there was enough left for me to finish the quilting.
QAYGing the remaining ten blocks went fast with just pin basting and straight line quilting along the seam lines; it just took several hours. The top and bottom of the blocks were not quilted but would be once the backing was added. As I was quilting, I remember more about how these blocks came to being and why maybe I never finished this project.
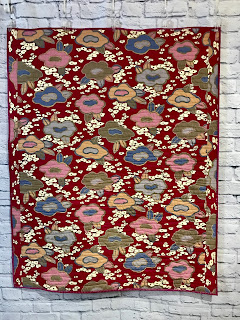
I know that these blocks were started in 2014 after Jera Brandvig’s Quilt As-You-Go Made Modern was released. From looking at the two blocks which were already quilted, I knew I used my Elena 8900 and was unhappy with the way the straight line quilting looked and at that time I was looking to purchase a new sewing machine. I purchased my Juki 2010Q in 2015 but still did not resume working on these blocks and was packed away with another flimsy (seen below) made several years earlier with some of the same Sandy Gervais fabrics.
In March of 2017, I posted about this quilt, named  The Grandma Quilt and I quilted and finished due to the pending arrival of our future grandchild in which we didn’t know the gender. I, being the future first-time grandmother wanted a pink quilt to hold my grandchild in but I ended making another  quilt, The Grandpa Quilt in case we had a grandson who wouldn’t appreciate being photographed with a pink quilt. The Grandma Quilt ended up staying with the darling Granddaughter with the understanding that it would be returned to me after a suitable replacement quilt was made which I then told them I had one in mind. It was the rail block quilt I just finished, almost five years later.
After the blocks were quilted which looked so nice thanks to my Juki 2010, they were trimmed to 18-1/2” square which made a 54”x72” finished quilt. I decided to back the New Grandma Quilt with a pink plush fabric I had in my stash since it was dark enough to hide the QAYG seams even I thought at first it was too pink but it grew on me. I finished the quilt in two days and in time before leaving for the Grandparent house. Before arriving, I let the darling Granddaughter’s parents know of this quilt and that I would like my Grandmother quilt finally returned to me.
And why am I calling this quilt the new Grandma Quilt and not just a Valentines Day Quilt. Well, it turned out the original Grandma Quilt cannot be found or has been misplaced which I am a little peeved; lesson learned, you snooze, you lose. So, the once Valentines Day Quilt is now the new Grandma Quilt and will be staying at the Grandparent House and will be added to the darling Granddaughter’s collection. Do I feel guilty about not letting her take it home, Nope, I plan to snuggle with her and the new Grandma Quilt and tell her a once upon a time story about a Grandma Quilt which came to the hospital on the day she was born.
As disappointed as I am with not getting the Grandma Quilt back, I am glad that the new Grandma quilt is a Finally Finish and now I have one less UFO. It feels like I have a wee little more space in the studio now. I don’t think this would be considered a DrEAMi being that it wasn’t a new project but it was an interruption. I can resume finishing some quilts which I was in the process of doing until I happened upon long-forgotten, but should have been finished sooner, the new Grandma Quilt. I’m planning on finishing my January and February quilts for the Country Threads Dirty Dozen UFO Challenge and hoping I don’t come across another long-forgotten project.

Linking up with: My Quilt Infatutation/NTT

Wednesday, January 26, 2022

The Twisted Trail Quilt

The Twisted Trail Quilt was my last flimsy finished in 2021 and I waited until this month to finally finish it so I could write a tutorial (yes, I’m joining Kathleen McMusing’s Tips & Tutorial on the 22nd #25 Linky Party) on how simple and quick this quilt is to make and even more nicer, a great stash buster. If you’re like me who has been quilting for over twenty-five years and started out as a traditional quilter, you may still have a stash of Thimbleberries, Kansas Troubles or Civil War or primitive/country prints which you still love even though the colors and prints are not as fun as the new modern prints-this would be a great pattern to use for these fabrics.
Last November, I posted my Hocus Quilt which was inspired by Gudrun Erla’s Locus Quilt which is a layer cake pattern for 10” squares of fabric. The Hocus Quilt used a different size square because I had at one time cut up a bunch of smaller squares with my Kansas Trouble stash. I named this quilt Hocus as in Pocus since I thought it was so magical that these rail blocks were made from squares and not from strips. I also mentioned in this post that I wanted to make another quilt like this but would use strips instead of squares and also use my stash of Thimbleberries fabrics. I love making quilts with strips, usually 2.5” that I die-cut and rail fence blocks are one of my favorite because of the fast and simple construction and it goes really well with lots of different types of fabrics. Rail Fence Quilts are my go-to pattern for baby quilts, quilts gift/donation quilts  and also the best for quilts you know are going to be used/abused a lot which in house means that they’re going to be thrown on the floor or one of our dogs can be found snuggling with it. These are the quilts I like to lay on a couch or chair.
I decided to name my follow up to the Hocus Quilt, the Twisted Trail Quilt since it is made with strips,  the blocks are larger and the layout is different, plus I wanted to allude to it being a rail fence pattern. I originally pulled fifty-six prints from my Thimbleberries stash which was easy to do since there was a time, especially when I worked at the quilt shop, I used to buy prints from every collection when it was released and only stopped buying them almost twenty years ago when I left the shop and by that time acquired a nice stash.
I had planned to make the Twisted Trail quilt 84” long but had to reduce it to 78” (which I will explain later in the post) so I ended only using forty-four prints which was still more than needed. This is where the start of my tutorial on how to make the blocks begin once you decide on your fabrics. Like with most rail fence patterns, there should be good contrast between the fabrics, like light and dark, etc.
  • Block Size: 6”x 18” wide
  • Two different fabrics are used for each block and there are two block layouts, Type A & Type B
  • Three strips measuring 2.5” x21” in each color is needed and will make (2) blocks. If your strip are less than 21” then you will need additional strips
My color palette for the Twisted Trailer quilt used blues and greens paired with beige/tan lights for my Type A Blocks and reds and browns paired with gold lights for my Type B Blocks.
For the Type A blocks, sew two strip sets, one with the color fabric on the top and bottom with the light in the middle and the other strip set with the light on the top and bottom and the color print in the middle. Press the seams according to the yellow arrows.
  • The strip set with the color fabric (blue) on the top and bottom should be cut in (2) 9.5” segments
  • The strip set with the color fabric (blue) in the middle should be cut in (4) 5” segments

Per the top pic, sew one 5” segment on each side of the 9.5” segment and press the seams towards the center segment.  These blocks should measure 6.5” x 18.5”.
For the Type B blocks, sew two strip sets, one with the light fabrics on the top and bottom and the color print in the middle and the other strip set with the color fabric on the top and bottom and the light fabric in the middle. Press seams according to the yellow arrows.
  • The strip set with the color fabric (red) in the middle should be cut into (2) 9.5” segments
  • The strip set with the color fabric (red)  on the top and bottom should be cut into (4) 5” segments

Per the top pic, sew one 5” segment on each side of the 9.5” segment and press the seams away from the center segment. These blocks should measure 6.5” x 18.5”.
In the top pic of the two block types, you can see how they alternate with each other once they are sewn together and in the bottom photo, the seams of the blocks will nest with each other when sewn together whether horizontally or vertically.

The Twisted Trail quilt measures 54” x 78” with three blocks across and thirteen blocks down; a total of thirty-nine blocks, (20) Type A and (19) Type B. To determine how many strips to cut, you will first have to decide on what size you want to make the quilt. As mentioned earlier, three strips of two different fabrics measuring 2.5” x 21” will make two blocks. For this quilt, just 10 strip set of each color combination needed to be sewn; there was one extra Type B block left. This quilt sews quickly as long as you remember to sew and press your Type A and B correctly . And this, ends the block tutorial and I hope it is not confusing.
I had wanted to make the Twisted Trail Quilt longer, especially since I had enough fabric but the reason why I had to reduce it was because of the above fabric which is an almost twenty year Marcus Bros. Print called Story Dogs which I purchased a whole bolt of it when I worked at the quilt shop. I love these hound dogs since one of them reminded me of our dearly departed blue tick coonhound and I had previously used some for a backing for a quilt made with Thimbleberries fabric. I still had enough left over and was planning on using it for the Hocus Quilt but when I saw the colors, I knew it would go better with the Thimbleberries fabric which is another good reason why the Twisted Trail Quilt needed to be made—the backing was cut and already sewn for a 78” long quilt and which is why this quilt couldn’t be any longer.

Machine quilting was a combination straight and wavey lines with a golden tan Star Machine Thread. Doesn’t the backing look wonderful with all of the Thimbleberries prints? This quilt will be going to the Grandparent House. It turns out that Grandpa’s recliner, the most popular chair in the living room and coveted by the darling granddaughter and the four-legged creatures is the only chair that does not have a quilt covering it; yes, I expect this quilt will be thrown on the floor by you know who.

Even though I said that my stash of traditional fabrics would be great for the Twisted Trail pattern, I’m now thinking it would work well with my stash of patriotic fabric, I’m already envisioning making one with a slightly different layout, and also seasonal/holiday fabrics. You can also make this quilt just using like all blues and lights, just designate which blues are to be used for which block type. Also, a suggestion, do not use the same fabric for both block types because as Quilt Karma layout would have it, the blocks with the same fabrics will be next to each other and you won’t notice it until after the quilt is finished. I do think some of my modern stash which I usually reserve for my Ernie Quilts might work as well. It’s really a great pattern to use up the stash and makes a very happy, scrapppy quilt.
I’m having a pretty productive January so far as this is my third Finally Finish for the month. Cold, snowy weather makes great sewing conditions. I would have a fourth finally finish, Petal Pop, my January quilt for the Country Threads Dirty Dozen UFO Challenge, but it’s only a flimsy right now. I had hoped to have quilted it by now but I ordered some white batting in which the first shipment was lost and the replacement won’t be here until the end of the month. Bummer, for a no pressure Challenge, I still hate missing a deadline.
Meanwhile, I started a new project—a new pattern (not an affiliate link) with mostly new fabrics. We’re experiencing some sub-zero temperatures for the next few days so I will be sewing me some fun. Good news, all the die-cutting and rotary cutting— I did not hurt my knee.


Friday, January 21, 2022

Postcard from Sweden sQALrrel

I started the New Year off with having no set plans or projects; just to continue participating in the 2021/22 Country Threads Dirty Dozen UFO Challenge and the yearly mmm Quilts Celebrating a Famous Canadian Birthday QAL which usuallly starts in April. Apparently now, I’m participating in two of Sandra’s QAL this year having just finished my Postcard from Sweden quilt. This one was really done under the auspices of a sQALrrel lead by madammmenabler my latest name for you know who.
I had just finished my flimsy for January’s CT UFO Challenge and had a few days to make another Brown Bear quilt for the darling Granddaughter before we left for the GP House, but what did my wondering eyes happened to see on IG on January 10th that Sandra was hosting another Postcard from Sweden QAL starting on January 16th. For a brief minute, I sort of shrugged it off having participated in the first QAL and thinking I didn’t need another one since I’m not a big fan of making quilts with solid color fabric. (You can see and read the details from the first PFS quilt Here.) But then my mind got to thinking of other possibilities this quilt could be made with like, Grunge or other tone on tone fabrics which I’ve amassed during the last months of 2021 but then realized that the latest Postcard from Sweden (PFS) quilt would be so interesting in Marcia Derse fabrics which I’ve been collecting for over ten years. I still had the pattern, fabric cards I made of the Kaffe Fassett Shot Cottons and Peppered Cottons used for the first PFS quilt and the extra HSTs leftover which came in handy so rather than waiting to start on the official start date, I wanted to start right away to see if my idea of using prints would work. 
The color cards helped in in choosing which Marcia Derse fabrics were similar to the Shot Cotton/Peppered Cotton used before and I did not limit my selection to just solids but also included prints which I thought would add an interesting look to my second PFS quilt. (I might add thatI did this when I should have been working on the Brown Bear II Quilt of which I’m saying I took a brief “Paws”.) The original PFS quilt used 36 different fabrics but for PFS II I used 46 different fabrics since there were some Marcia Derse fabrics which I didn’t have enough of and used Shot and Peppered cotton HST leftovers of the same color number and mixed it with that. I did have to resort using one Lonni Rossi print for the one color I still didn’t have enough so there is one color number which uses three different prints which makes PFS II so interesting.
Even though the QAL did not officially start until January 16th, my blocks were finished by the 13th, right before leaving for the GP House with the Brown Bear II quilt in tow. I made my blocks one at a time to make sure the correct fabric was in the right place and the seams were pressed in the right direction. I normally walk over to the ironing board which is a few feet away to press but decided to purchase a TV tray to make an ironing station next to  my sewing machine in order to keep my blocks straight and to save time—what a difference.
Sandra “egg-couraged” me by saying that my PFS quilt would probably be finished by the 18th but only the flimsy was. It could have been done if we didn’t go to the GP House and although it would have been tempting to stay home it wasn’t enough for me to give up seeing my darling Granddaughter even though she had a cold/cough. Fortunately, we returned home with our health in check and the PFS II quilt was a finally finished on the 20th.
Like the first PFS Quilt, machine quilting was done with wavey lines, 1” apart and a CT Essential Thread in Magenta was used. While sewing this quilt, I was worried about the binding since I knew I did not have any yardage of a Marcia Derse fabric I could used but fortunately last year I inadvertently ordered a yard of V&Company ombré woven fabric in Magenta which worked well with this quilt.

Tuesday, December 28, 2021

Best of 2021

,
I’m joining in Cheryl’s Best of 2021 Linky Party which is always a fun post to do. I depend on the kindness of Linky Parties since my posts are somewhat lost in Blogland and may be due to my RSS feed not being recognized-it’s still an ongoing mystery. With that being said, my best of 2021 doesn’t include my five best read posts but inspired by an idea from Nancy, Grace and Peace Quilting; I’ve come up with my own categories. You can read the posts by clicking on the link.

Best Quilt Holding by the Master Quilt Holder (Flutter), upper right corner. This quilt almost fell into two of my other categories, the post most read and my smallest quilt made this year.

Best Oopsie  Quilt (Kaleidoscope Krosswalk), middle photo on the right.

Best Biggest Quilt (Gypsy King Quilt), never say never, but I QAYG a king-size quilt, lower photo on the right.

Best Smallest Quilt (Small Quilts), Actually I’ve made several, discovering the peace/piece of making small quilts and slow stitching, middle photo on the bottom.

Best Quilt With The Most Read (Ernie Checkerboard Express), The Ernie Quilts of which I made several over the years and is one of my favorite patterns, I added another element and did a Tutorial, left photo on the bottom.

I thought I would mention that three out of the five quilts mentioned in this Best of 2021 post, has a My Quilt Infatuation connection and if your looking for easy quilts you could make with lots of different fabrics/scraps, do check out her patterns, not an affiliate link.

Thanks Cheryl for hosting another wonderful Linky Party and looking forward to more quilt making in 2022 so I can join in the fun next year.


Wednesday, December 22, 2021

Country Thread’s Dirty Dozen UFO Challenge: #1 Feedsack Star

My Feedsack Star quilt is my December finish and I am so thankful that it was a quick and easy finish being only 31” square. It only took around seven years to finally finish since parts of this quilt were started in 2014, which are the tiny feedsack circles in the corner nine-patches. 
I thought this would be a good post to finally explain how these 2” feedsack circles came to be and waiting for a project that I could finally include them in. Back in 2014 I finally finished my Feedsack Clamshell Quilt which you will see later in another Post in the future since some of the leftover blocks is another quilt which is part of the UFO Challenge.

The feedsack circles are made of four quarter circles which were cut from the bottom of the clamshell freezer paper pieces and  I could not bear to throw them away and figured I could find a way to make something with them. I decided to sew four of them together, then sew them on light interfacing which a circle drawn a little smaller than the sewn feedsack circle and then the interfacing was trimmed 1/4” around the circle. While deciding on what to make with these circles, I passed a few of them, liking them as feedsack coins,  to a few friends, some of them to Susan of Patchwork and Play who also immediately made something with them.
The feedsack circles sat around for several years before I appliquéd them to 4” black hatched print squares which was a project I took on a road trip. Then it laid around for several more years until August, 2020 when I had an idea to make a wall hanging since I finally decided that these circles were meant for small projects.
Almost five years ago I wrote a post about Feedsack Fabrics and Friends which I mentioned my love of feedsack fabrics and how I accumulated a stash through the kindness of friends. After this post, I became blog buddies with Wendy Caton Reed of The Constant Quilter whom we both share a love of feedsack fabrics and a past fondness for Tom Selleck. Wendy sent me a pack of 3.5” feedsack squares, many of which I’ve never seen before. I thought I would make nine patches with a combination of the feedsack circles and Wendy’s squares and just needed to trim the appliquéd circles a half-inch  in order for them to be the same size as the squares.
The center nine-patch were made with all squares. Once the nine-patches were sewn, I then needed to sew four QSTs with a red pin dot fabric, a black and red feedsack reproduction print and the black hatch print used for the appliquéd circles. All of the squares measure 9” finished and once the inner and outer borders were added made a 31” square wall hanging.
I did machine quilting in the ditch around the star and nine patches and then did diagonal big stitch hand quilting with black embroidery thread across the star and nine patches. Tiger tape helped to keep my stitches nice and even.
The backing is an Aunt Grace print and the binding was hand sewn which is what I like to do for wallhangings.
I wasn’t sure if I had a spot to hang this sweet quilt but then realized that it would fit on one of the wide black doors in the farmhouse kitchen at the Grandparent House. Doesn’t it look sweet with Susannah, my metal goat? I thought Mary Etherington, host of the Dirty Dozen UFO Challenge would get a kick out of this photo since the goat is named after her late, great goat Susannah. I still have some feedsack circles and squares left so another small wall hanging may be in the plans. But first I need to check with Wendy Caton Reed to see if I ever sent her any feedsack circles, I can’t remember.
I thought my Feedsack Star Quilt was going to be my last quilt for 2021 but I was feeling a little quilt guilty about not making the darling granddaughter a quilt for Christmas. I decided after my last visit at the Grandparent House and spending days and hours watching Brown Bear videos with her that she needed a sofa snuggler which is what a Patchwork Blankie is. 
I ordered the fabric from Fat Quarter Shop (not an affiliate link) and had the teal plush fabric in my stash. I wasn’t sure of how these fabrics were going to be laid out but fortunately Nancy, Grace and Peace Quilting just posted a Vintage Santa Quilt which uses a large focal print and inspired me to come up with this pattern.


Since there is no batting in this quilt, I only did light machine quilting with silver polyester thread, straight and wavey. The Brown Bear Blankie measures 50” x 70” which is a nice size for two to snuggle under. This was a fast make, just under two days.

We’ll soon be heading to the Grandparent House for Christmas and will be spending the final days of 2021 at home which might give me enough time for one last quilt. We’ll see. 

Wishing everyone a Joyous and Merry Christmas, please stay healthy and safe.

Linking up with My Quilt Infatuation/NTT